



User guide
A complete step-by-step guide to everything in CCOS: first sign-in, creating meetings and inviting members and guests, video meetings, votes and decisions, through to approving and signing the minutes.
Screenshots come from a demo organization with sample data, not from any real organization. This guide is updated with every change to the platform.
Getting started
Signing in
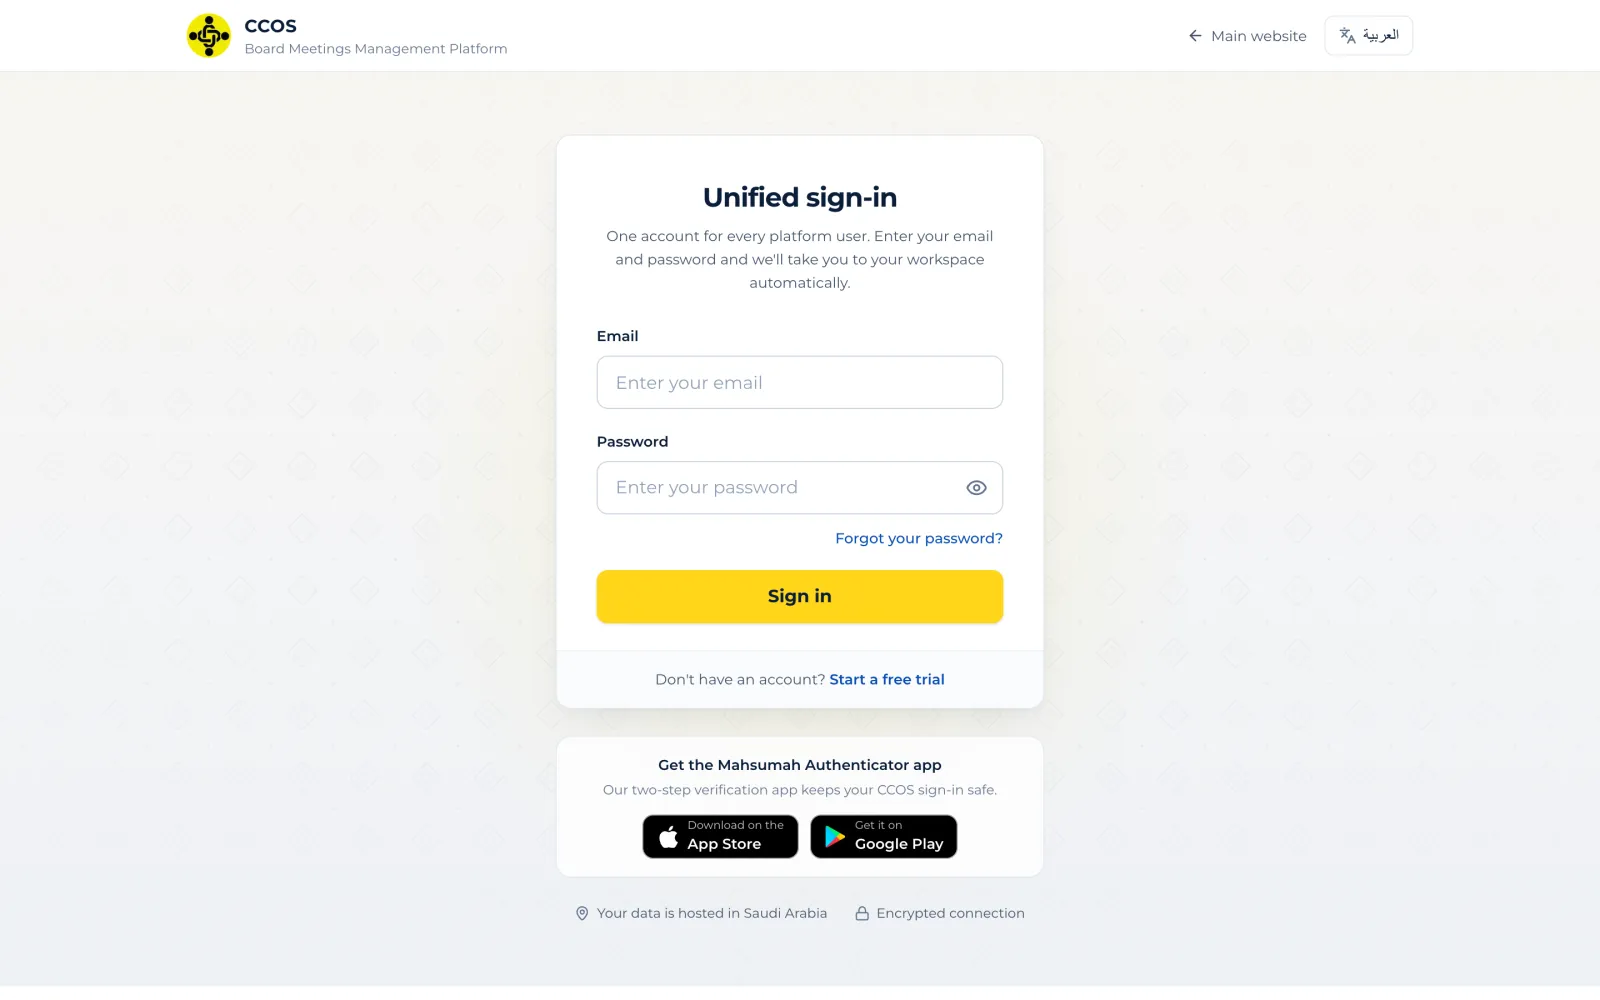
All members and admins sign in from one page. The first time, your invitation email has a «Set up your password» button where you choose your password.
Steps
- 1Open the sign-in page, type your email and password, and press «Sign in».
- 2Type the 6-digit code from your authenticator app (we recommend Mahsumah Authenticator).
- 3First sign-in: you set up two-step verification by scanning a QR code before the dashboard opens.
Important: Two-step verification is required for every account; a password alone never signs you in.
Getting started
Forgot password
Get back into your account yourself from the sign-in page, without contacting support.
Steps
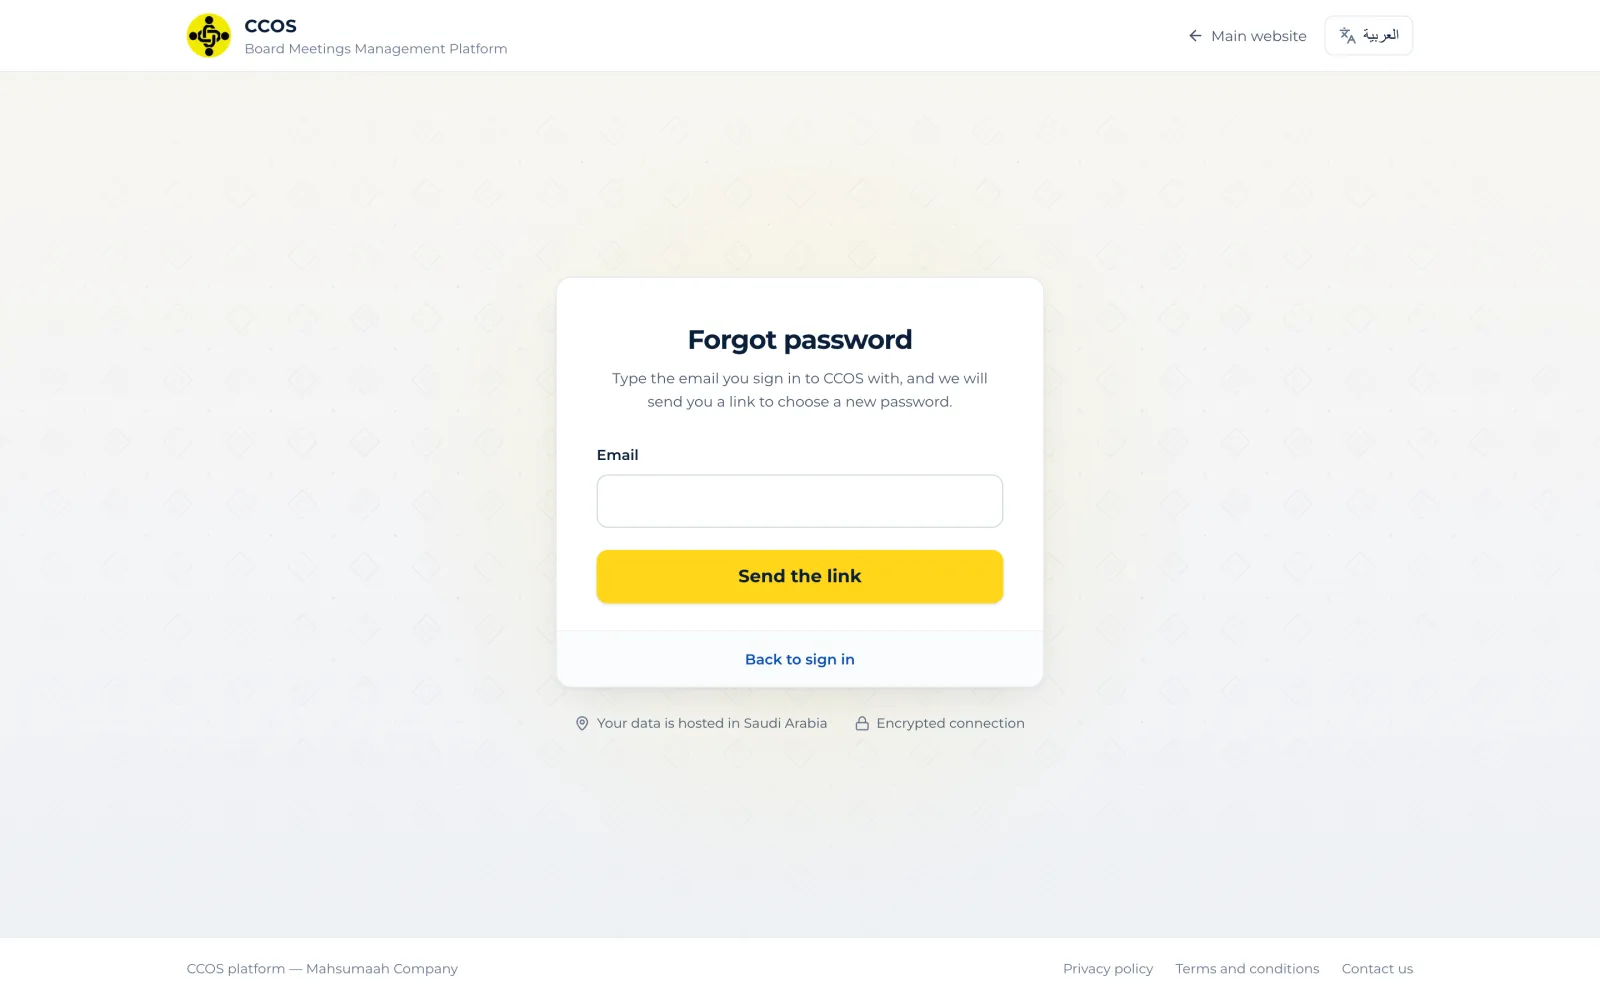
- 1On the sign-in page press «Forgot your password?».
- 2Type the email you sign in with and press «Send the link».
- 3Open the email and press «Choose a new password». The link works once and is valid for one hour.
- 4Sign in with the new password and your authenticator code as usual.
Tip: Your organization's admin can also send you a reset link from «Users». The link reaches you only; the admin never sees it.
Getting started
Dashboard
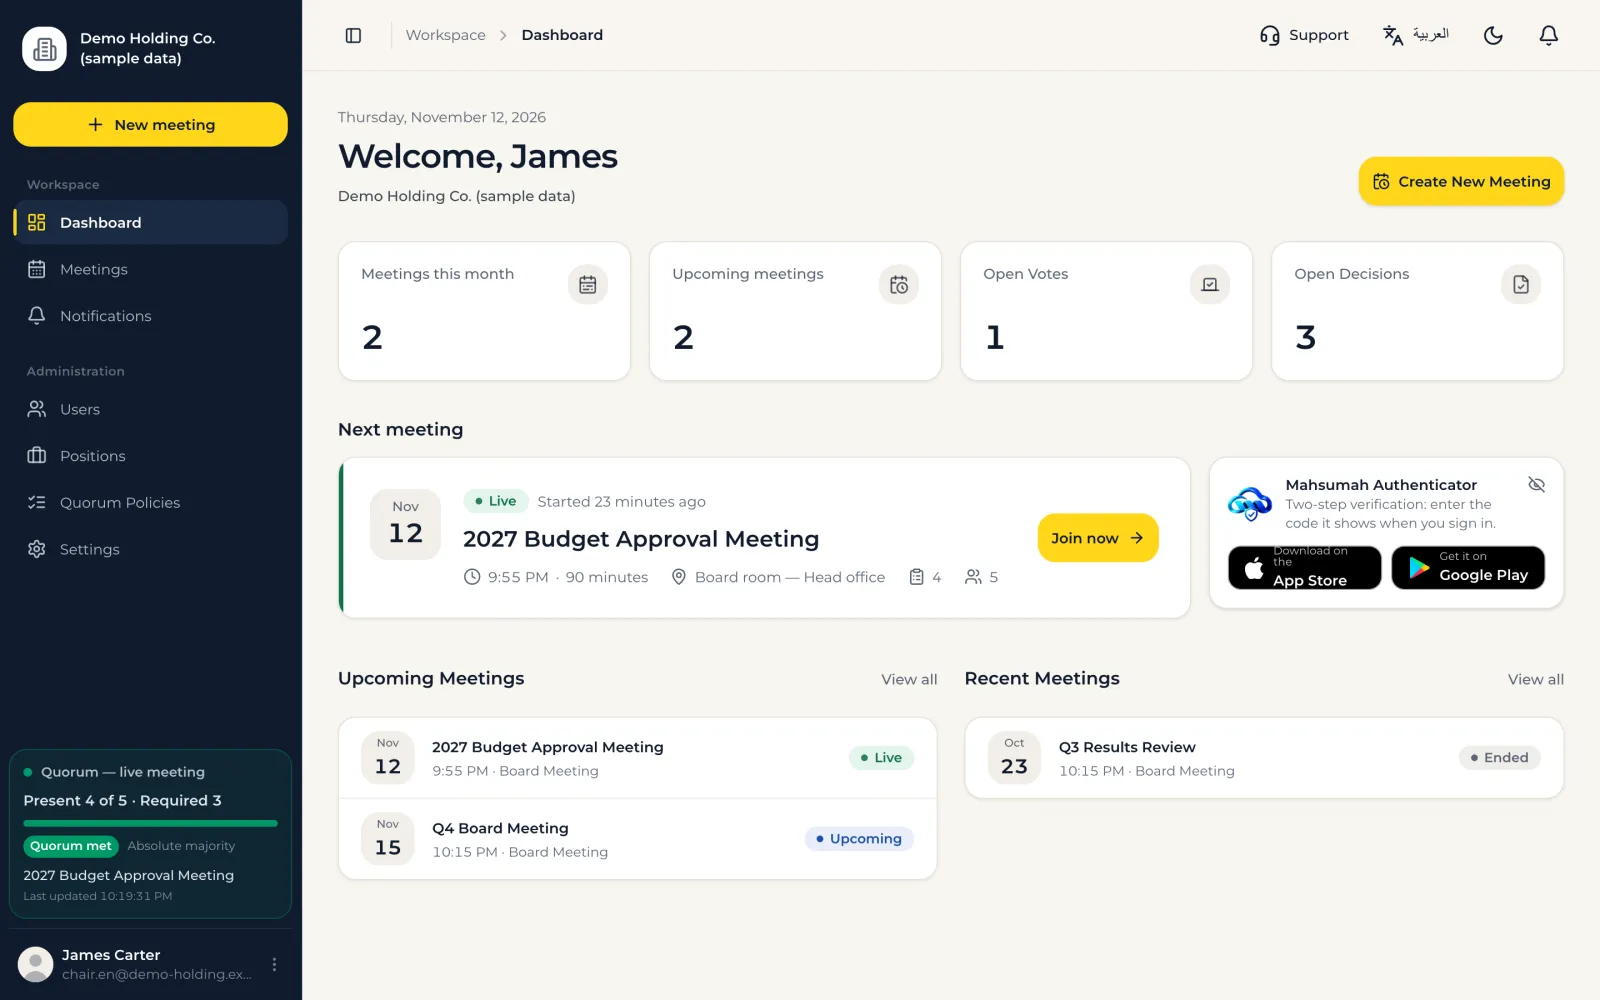
What you see after signing in: upcoming meetings, open votes waiting for you, decisions assigned to you, and new notifications.
- Side menu
- Workspace (Dashboard, Meetings, Notifications) and Administration (Users, Positions, Quorum policies, Settings), depending on your permissions.
- New meeting
- The yellow button at the top opens the new meeting form.
- Quorum card
- At the bottom: the quorum of the meeting in progress, present versus required, updated automatically.
- Language and theme
- Switch between Arabic and English, and light and dark, from the top bar.
Meetings
Meetings list
Your organization's upcoming and past meetings. Each meeting has its own number, such as CCOS-SMPL-26-0001 (organization code, year, meeting number), for use in correspondence.
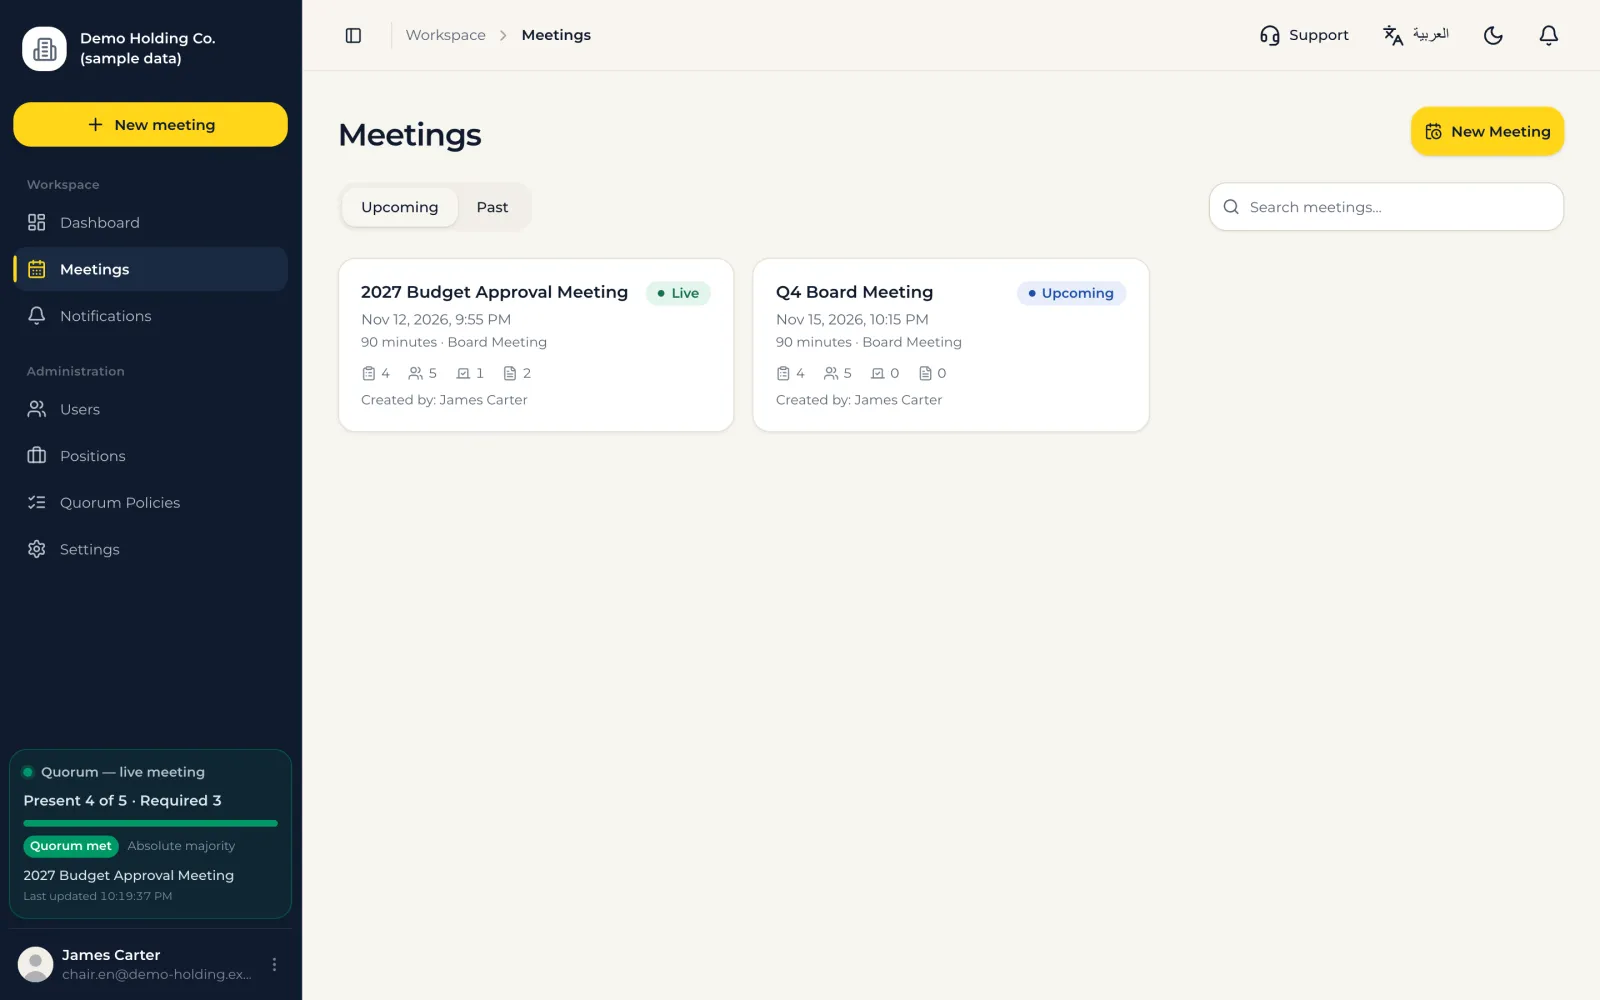
Tip: A meeting in progress opens straight on its room.
Meetings
Creating a meeting
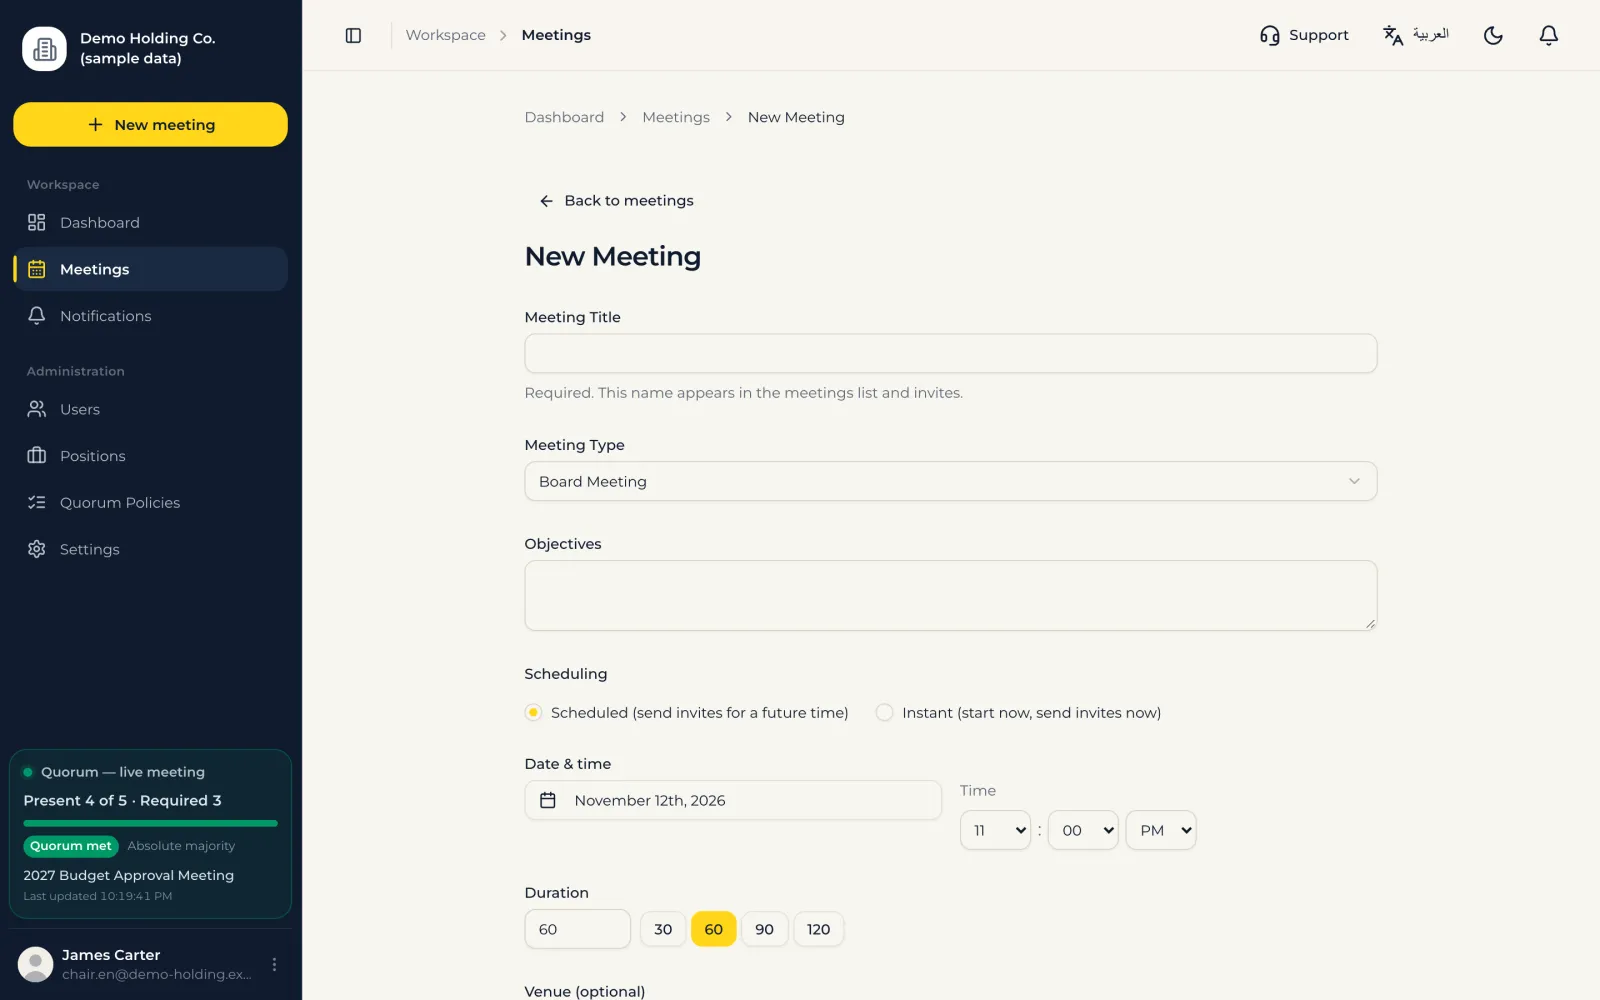
«New meeting» sets up everything on one page; invitations go out automatically when you save.
Steps
- 1Type the title, choose the meeting type (board, executive committee, and others) and write its objectives.
- 2Choose scheduling: «Scheduled» for a later time, or «Instant» to start now and send invitations immediately.
- 3Set the date, time and duration, and the physical venue if there is one.
- 4Video meetings run inside CCOS; you can use a Zoom, Teams or Google Meet link instead.
- 5Add agenda items: title, type (for information, for discussion, for decision), presenter and duration.
- 6Pick invitees from your organization, and add outside guests with name, email, job title and organization.
- 7Press «Create meeting». If the email does not reach some invitees because of a temporary fault at the mail provider, the platform resends to them only, automatically, after 5, 15, 60, 180 and 360 minutes, and stops if the meeting is cancelled or over.
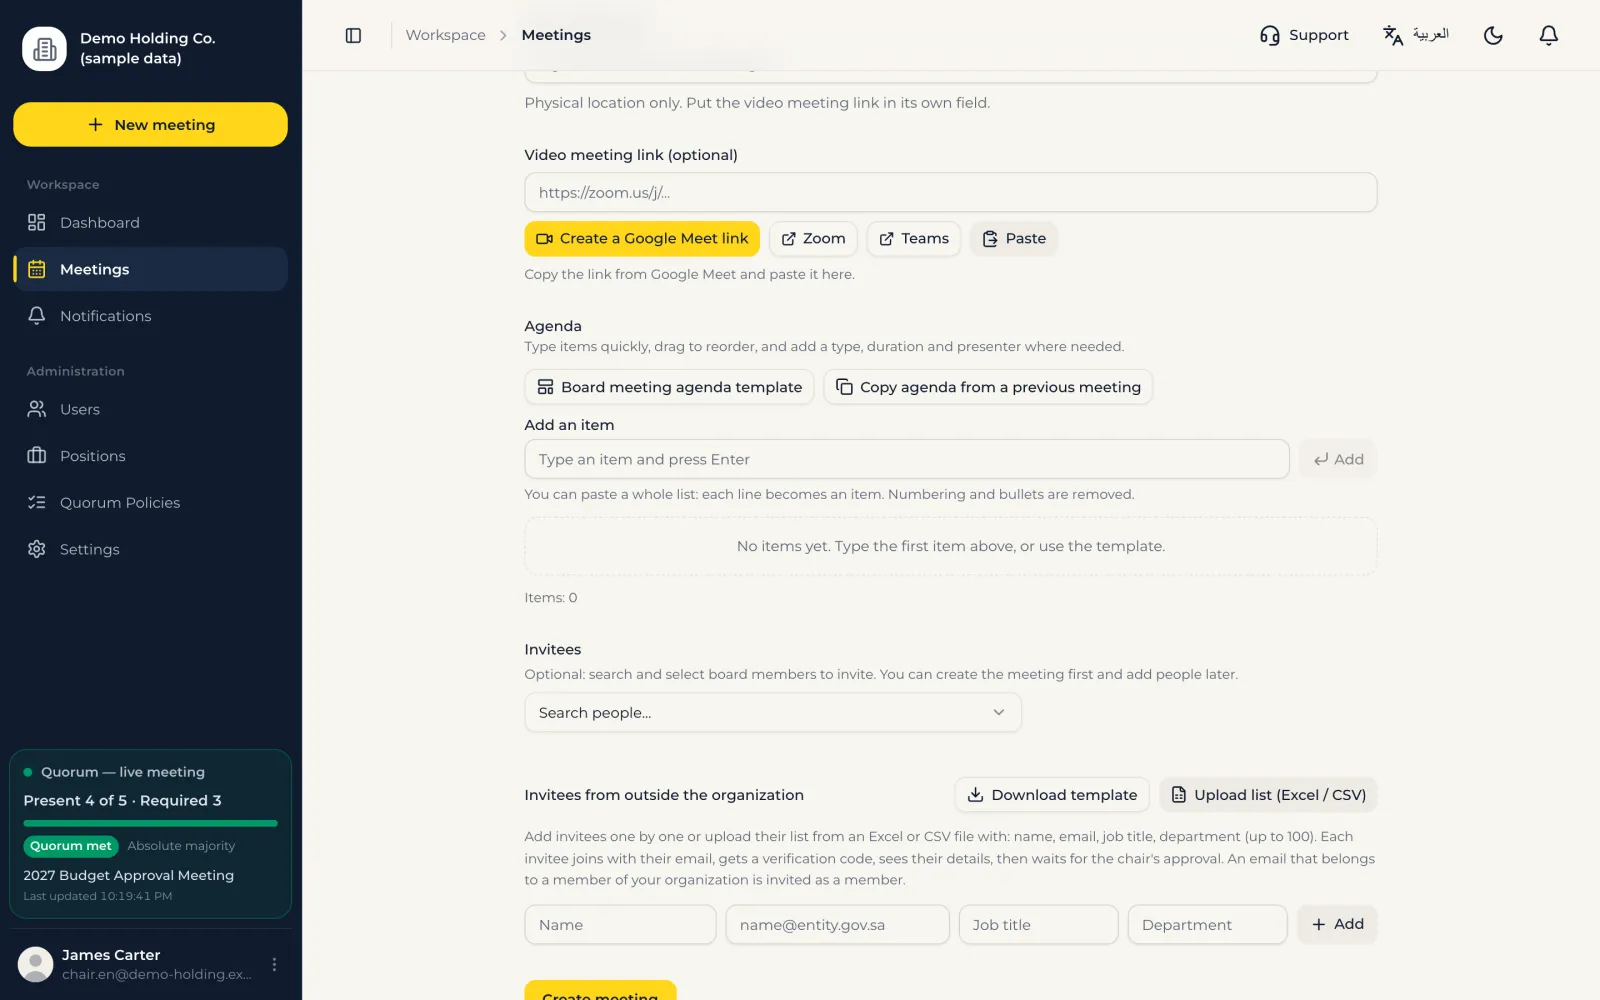
Tip: Long invitee list? Download the Excel template and upload it; you review the names before they are added (up to 100 guests).
Meetings
The meeting page
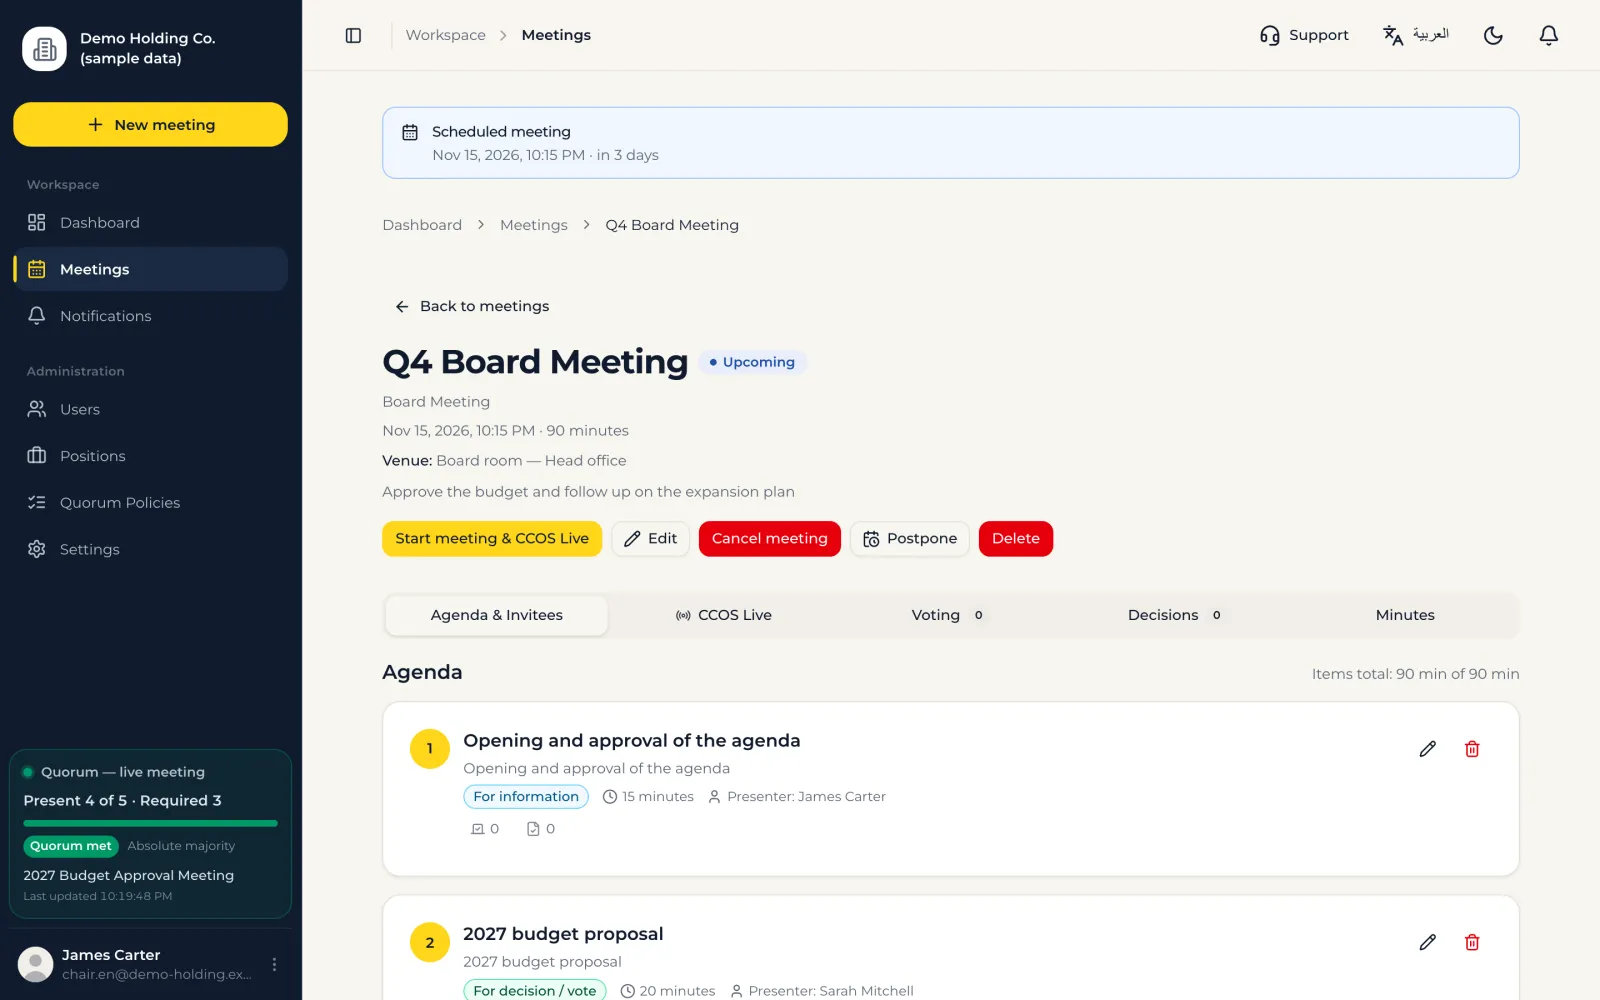
Everything about the meeting in one place, in tabs.
- Agenda & Invitees
- Items, invitees and their answers, attendance, attachments and proxies.
- CCOS Live
- The video meeting inside CCOS.
- Voting
- Create votes and see the results.
- Decisions
- The meeting's decisions, who owns each and when it is due.
- Minutes
- Generate, approve, sign and send the minutes.
Meetings
Answering the invitation and checking in
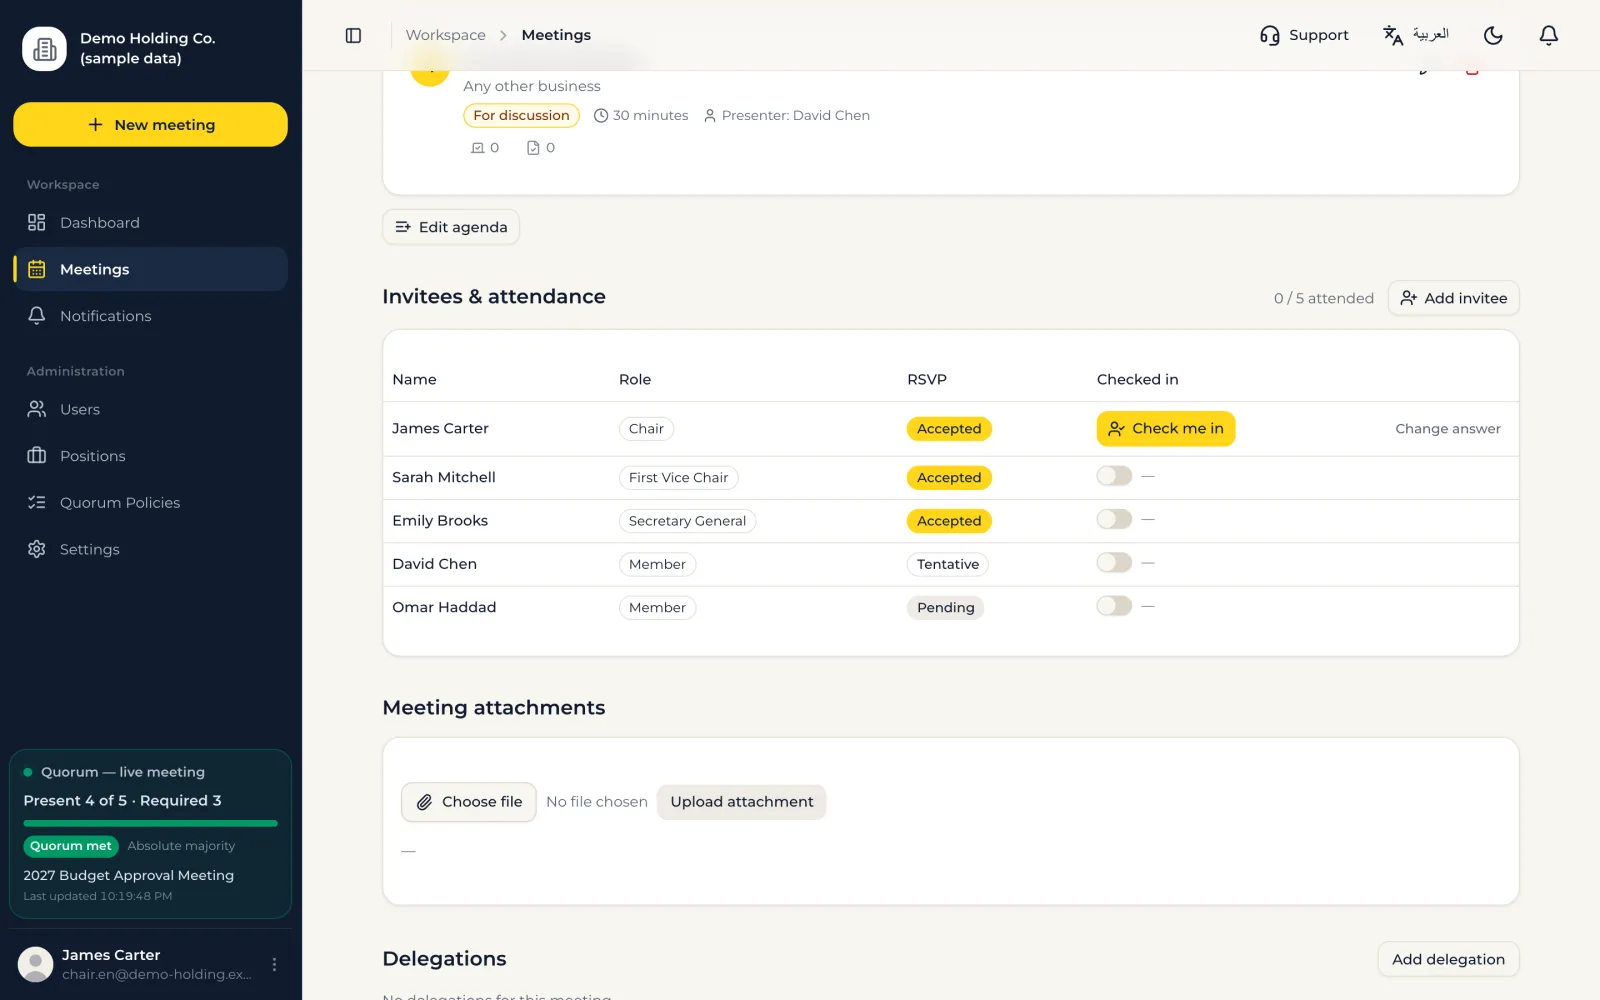
«Invitees & attendance» lists every invitee, their role and their answer.
Steps
- 1Press «Accept», «Decline» or «Tentative». After you answer, the buttons give way to «Change answer».
- 2If the meeting is in progress, «Accept» takes you straight into its room.
- 3During the meeting press «Check me in» so you count toward the quorum and can vote.
Meetings
Adding someone after the meeting is created
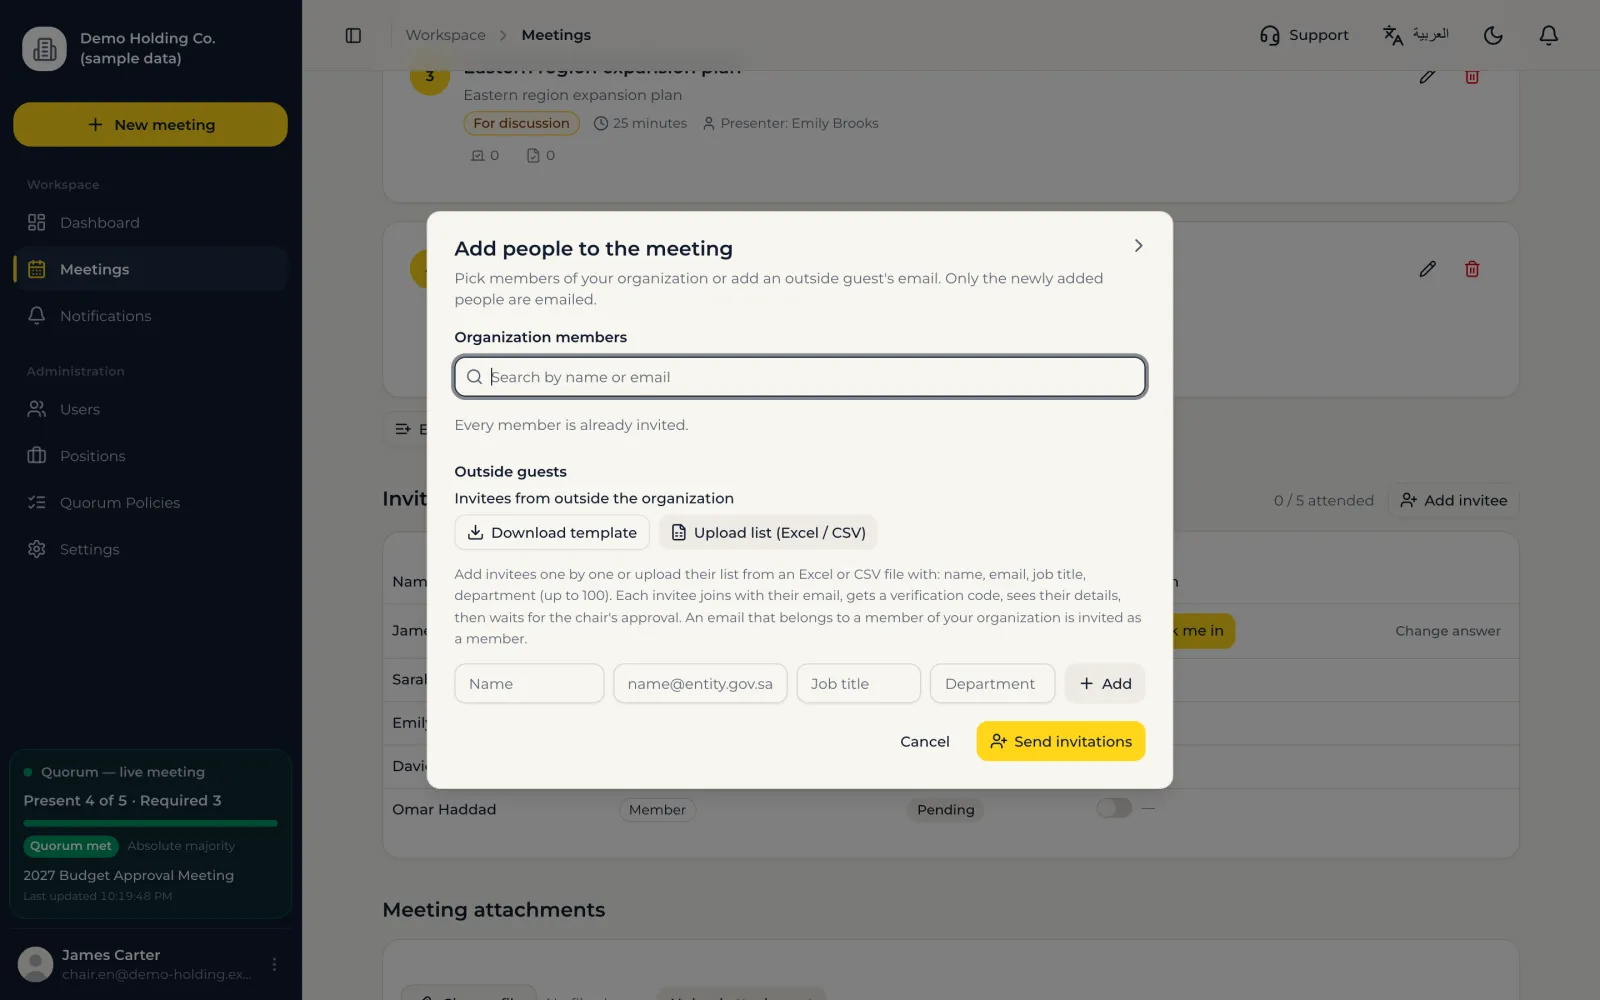
Forgot someone? Add them any time before the meeting ends; only they receive the invitation.
Steps
- 1In «Invitees & attendance» press «Add invitee».
- 2Pick organization members, or add an outside guest with name, email, job title and organization.
- 3Press «Send invitations». Only the newly added people are emailed; nobody is invited twice.
Meetings
Proxies (delegations) in a meeting
A member can delegate another invitee for one meeting: attendance only, or attendance and voting. Only a documented proxy is accepted.
Steps
- 1On the meeting page, in «Delegations», press «Add delegation».
- 2Your own proxy: pick the proxy and the scope, then «Submit». Creating it from your own account is your documented consent; a document is optional.
- 3A meeting manager acting for a member: pick the member, the proxy and the scope, and attach the authorization letter the member signed. Without that letter the platform refuses the proxy.
- 4The list shows each proxy's basis, «Confirmed by the member» or «Authorization document» with its name, and who recorded it and when.
- 5To revoke, press the revoke button beside the proxy. Who revoked it and when is recorded.
Important: Every active proxy appears in the minutes (from, to, scope, basis), and its creation and revocation are kept in the audit log.
Meetings
Postponing a meeting
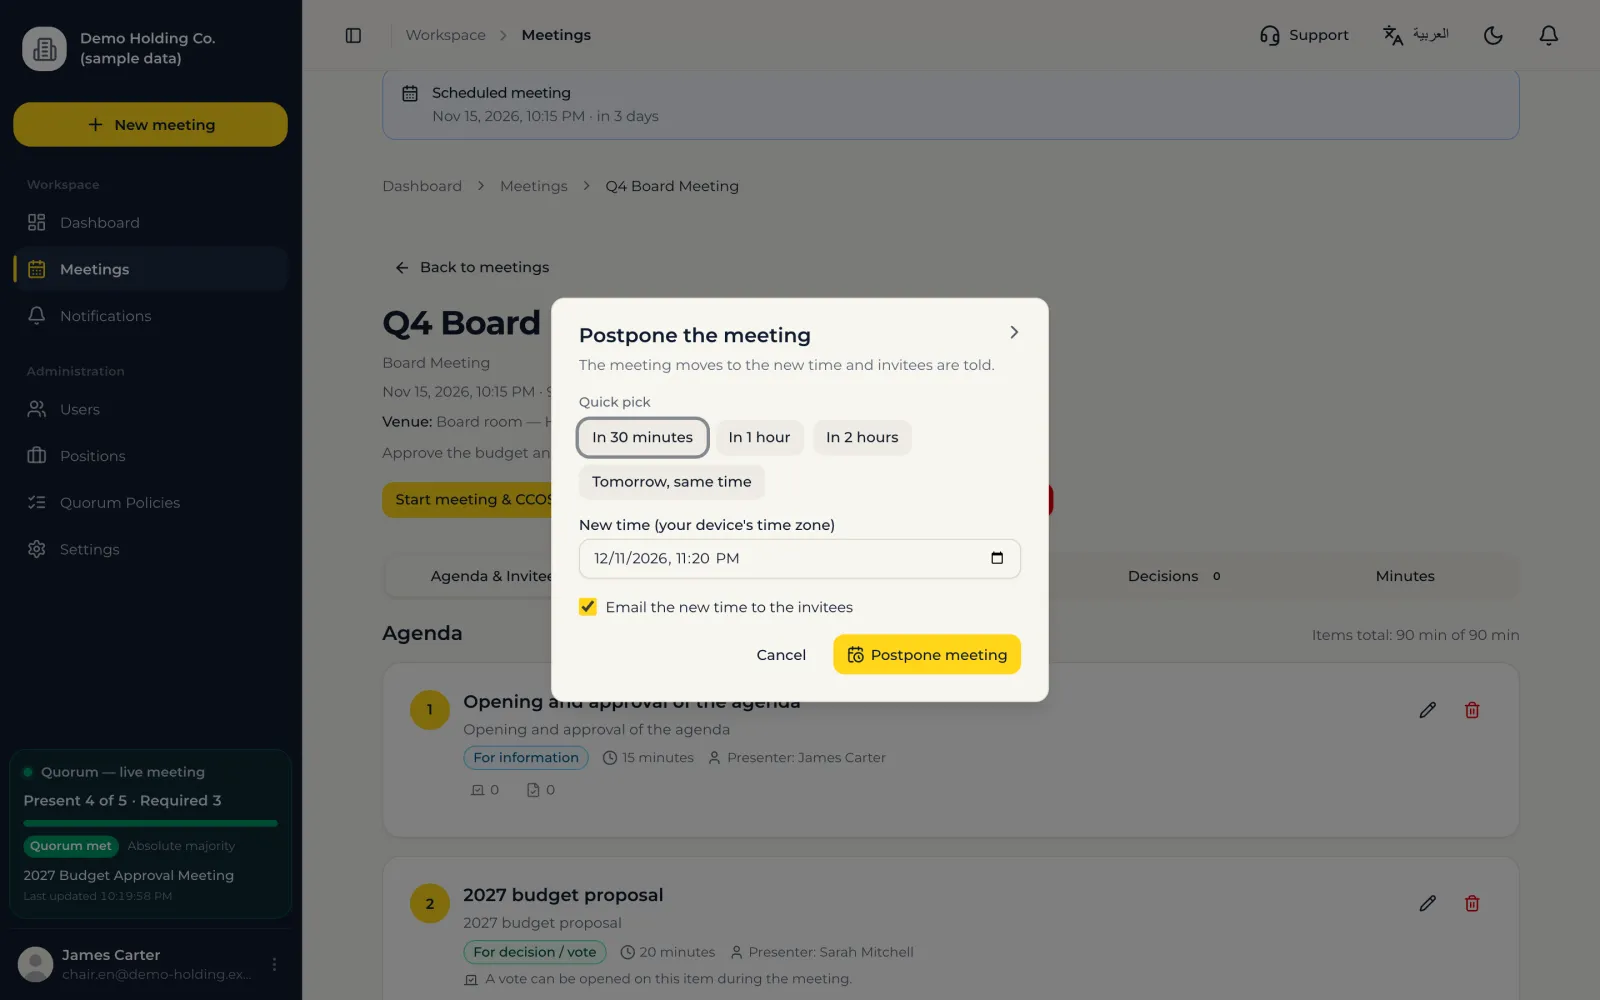
If a meeting that has started needs to move, «Postpone» closes the room and puts the meeting back to «scheduled» at the new time, without using up session time.
Steps
- 1Press «Postpone» at the top of the meeting page.
- 2Pick a quick option (in 30 minutes, 1 hour, 2 hours, tomorrow) or set the date and time.
- 3Keep «Email the new time to the invitees» on, so they receive a «Meeting postponed» email.
- 4Press «Postpone meeting».
Important: When you start again the session gets its full time, and attendance is taken again.
Video meetings
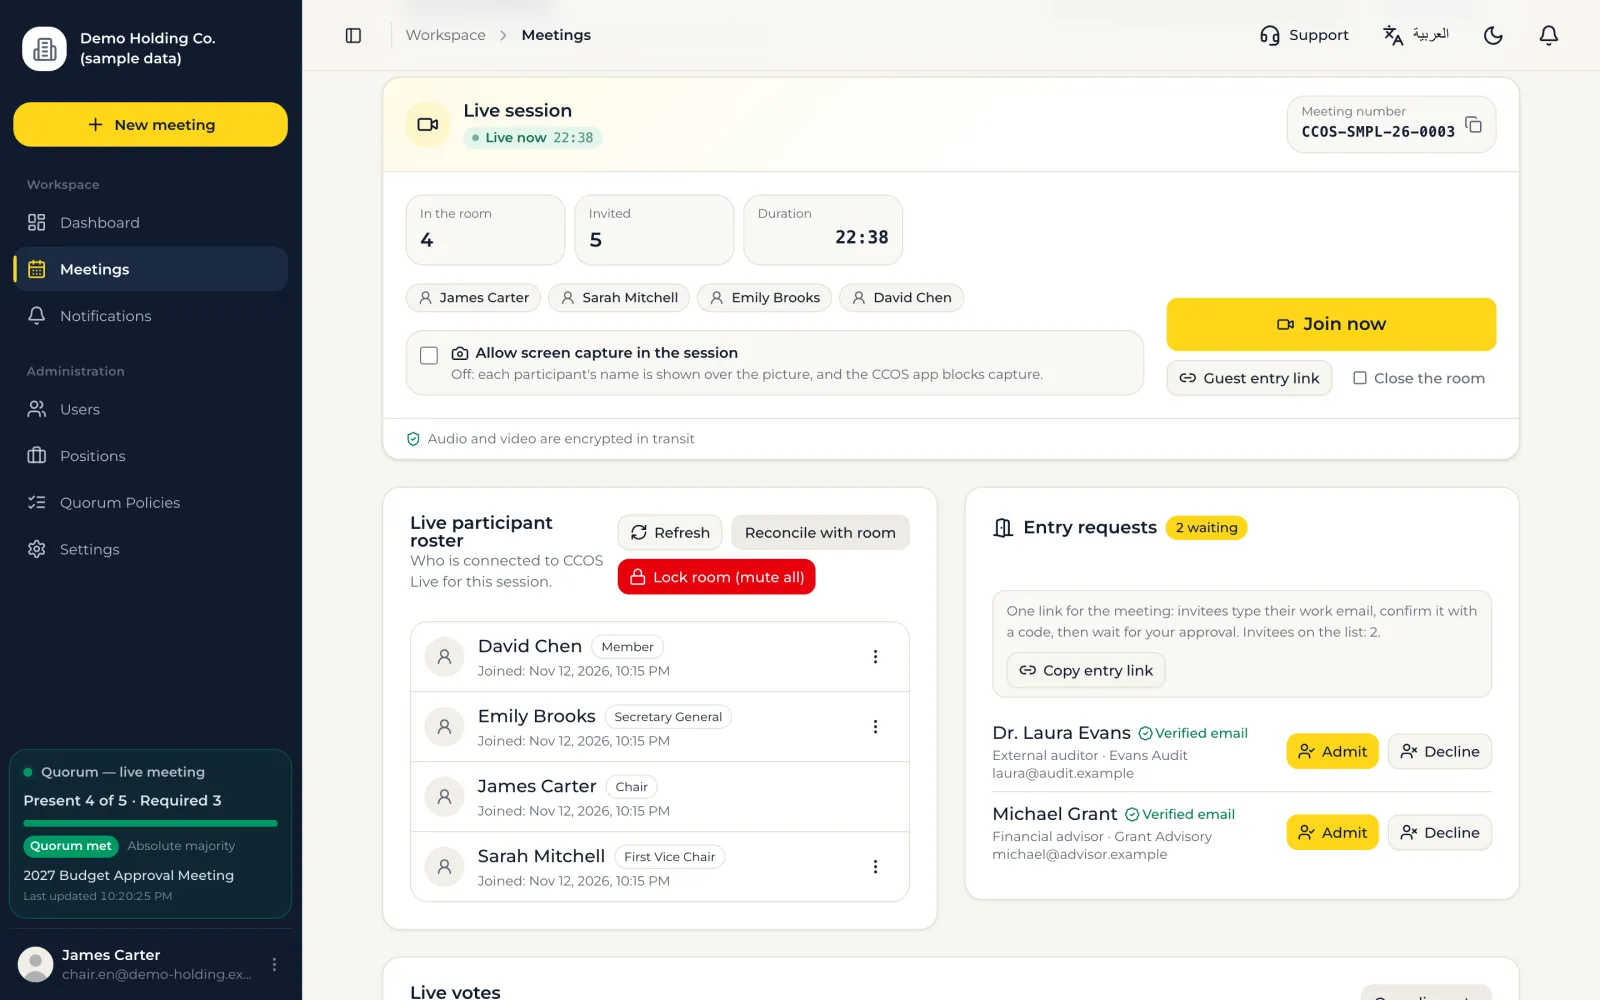
Live session: before you join
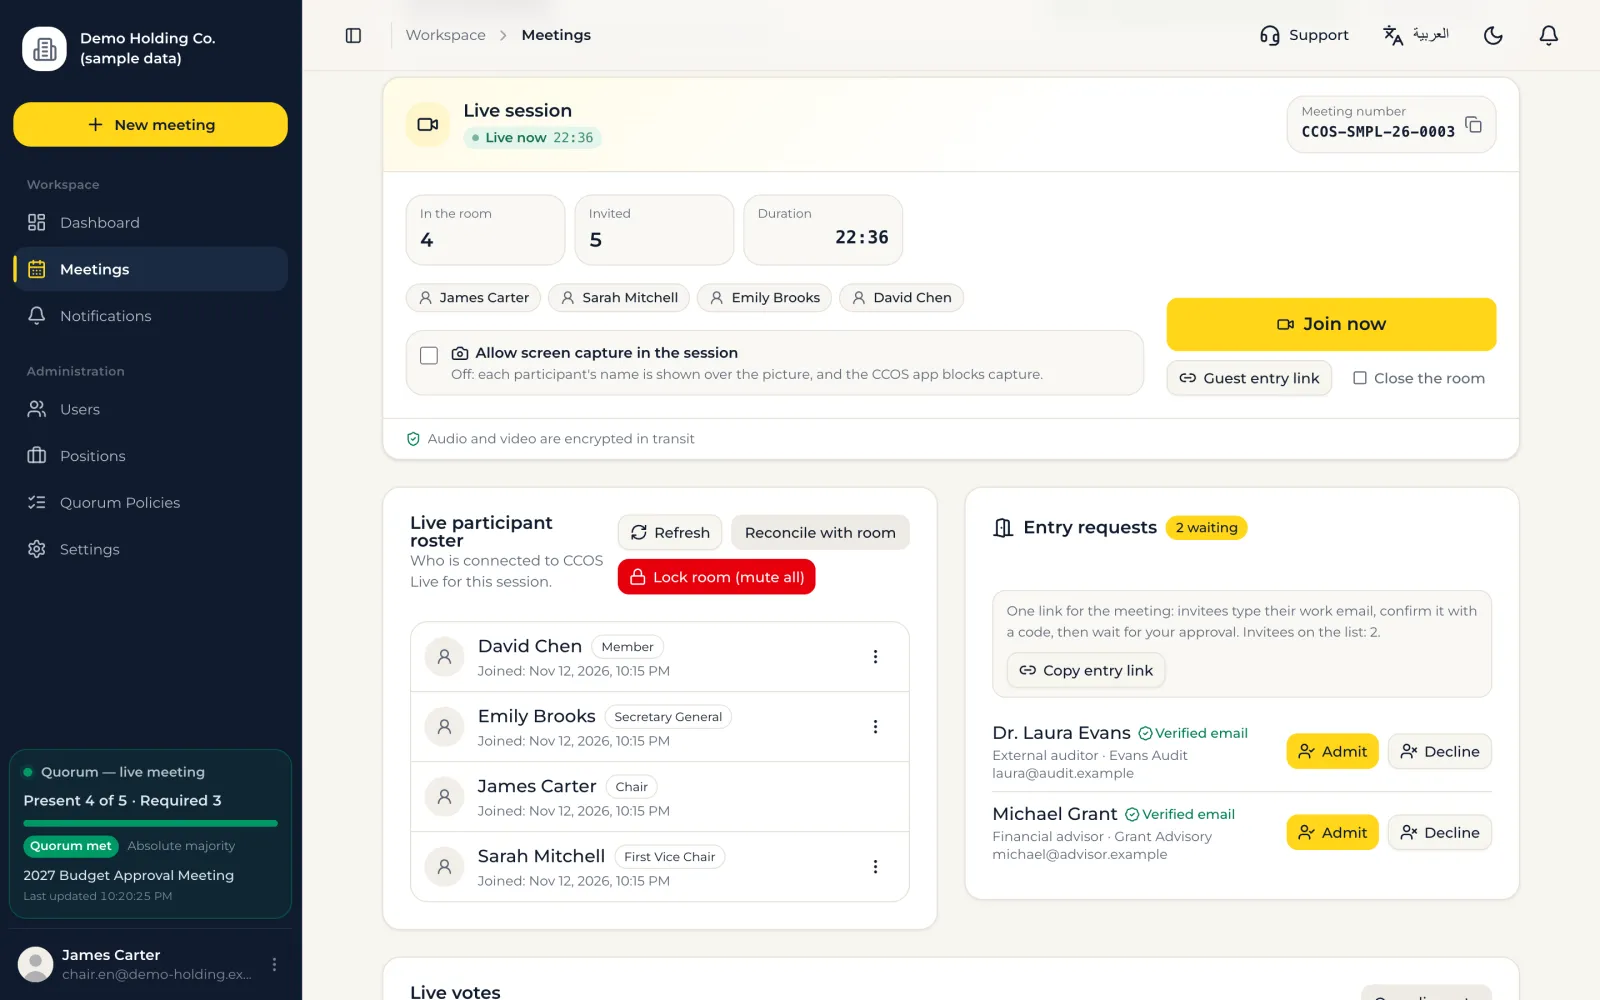
The «CCOS Live» tab shows the room's status before you enter.
- Meeting number
- Press it to copy.
- In the room, invited, duration
- Live numbers. Names of the people in the room are shown to the chair and meeting managers only.
- Start the meeting and open the room
- For the chair: starts the meeting, opens the room and takes you in.
- Allow screen capture in the session
- Off by default; only the chair decides (see Screen-capture protection).
- Guest entry link
- A short, unguessable link such as ccos.mahsumaah.sa/m/k7Qp2xZa that every invitee can use with their email.
- Close the room
- Ends the video session and sends everyone out.
Video meetings
Join in one click
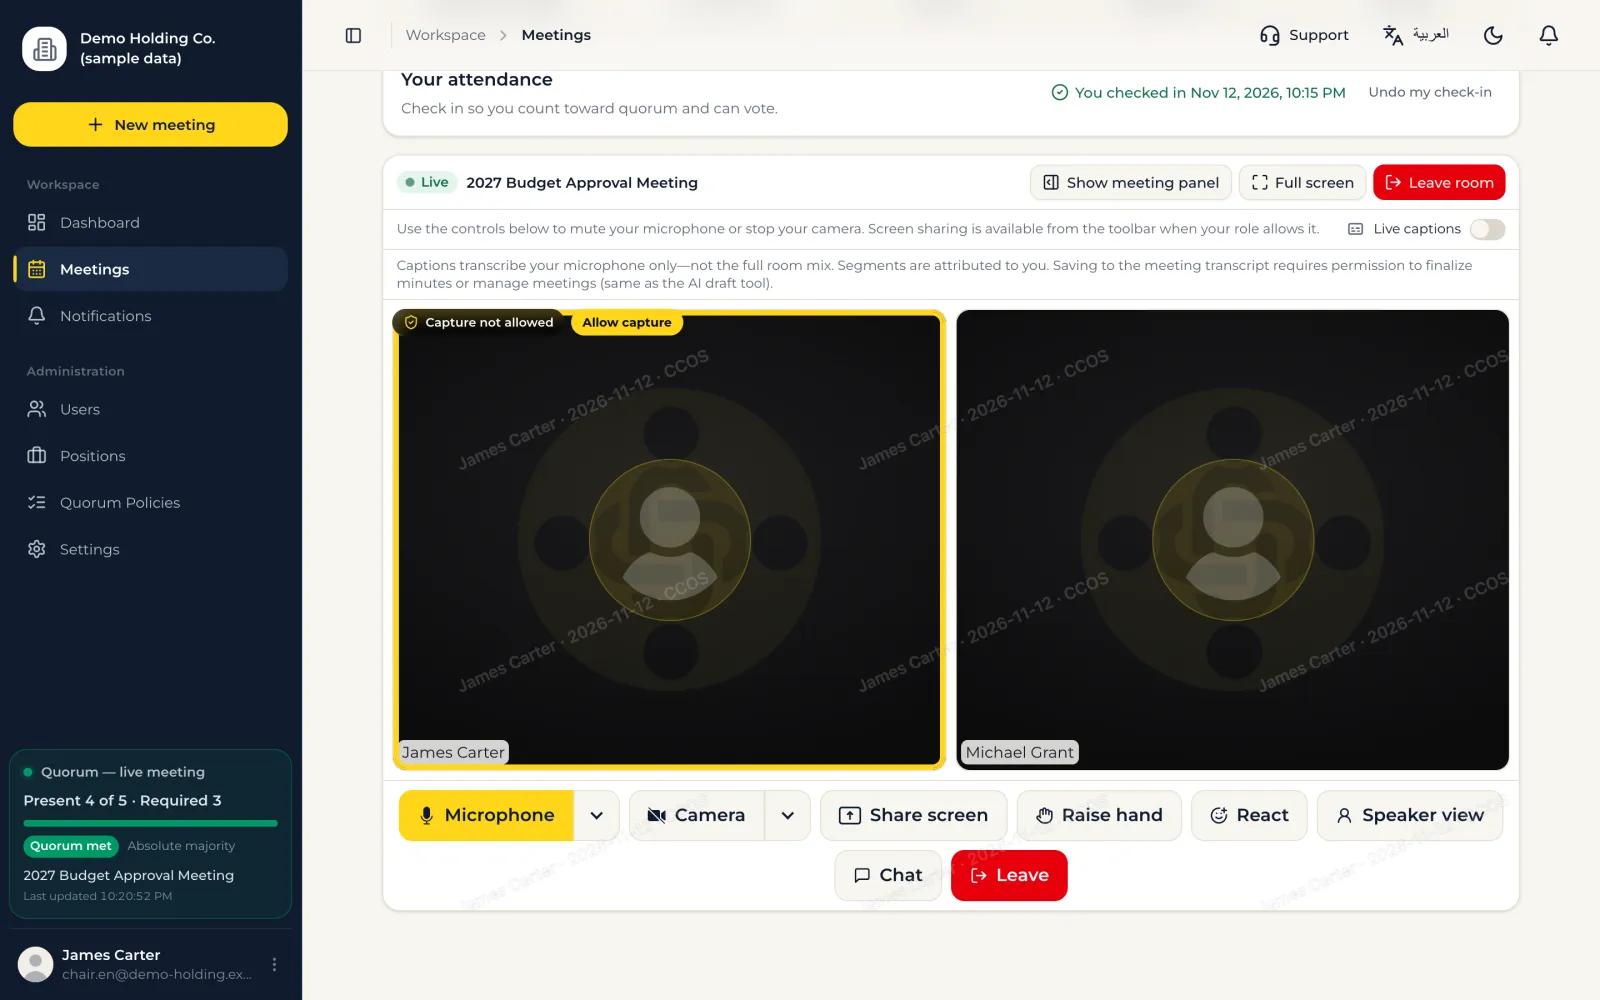
You enter the video meeting in one click, and the room fills the whole screen, as in Zoom.
Steps
- 1Chair: press «Start meeting»; the meeting starts and you go straight into the room in full screen.
- 2Member: press «Join now» in the «CCOS Live» tab, or open the meeting link, and you go straight in.
- 3The first time on a device, the browser asks for camera and microphone access: press «Allow».
- 4Change the camera, microphone or speaker from the arrow next to each button inside the room.
Tip: Your camera and microphone choices are saved on each device and used automatically next time. On phones, sound plays from the device speaker or the connected Bluetooth headset.
Video meetings
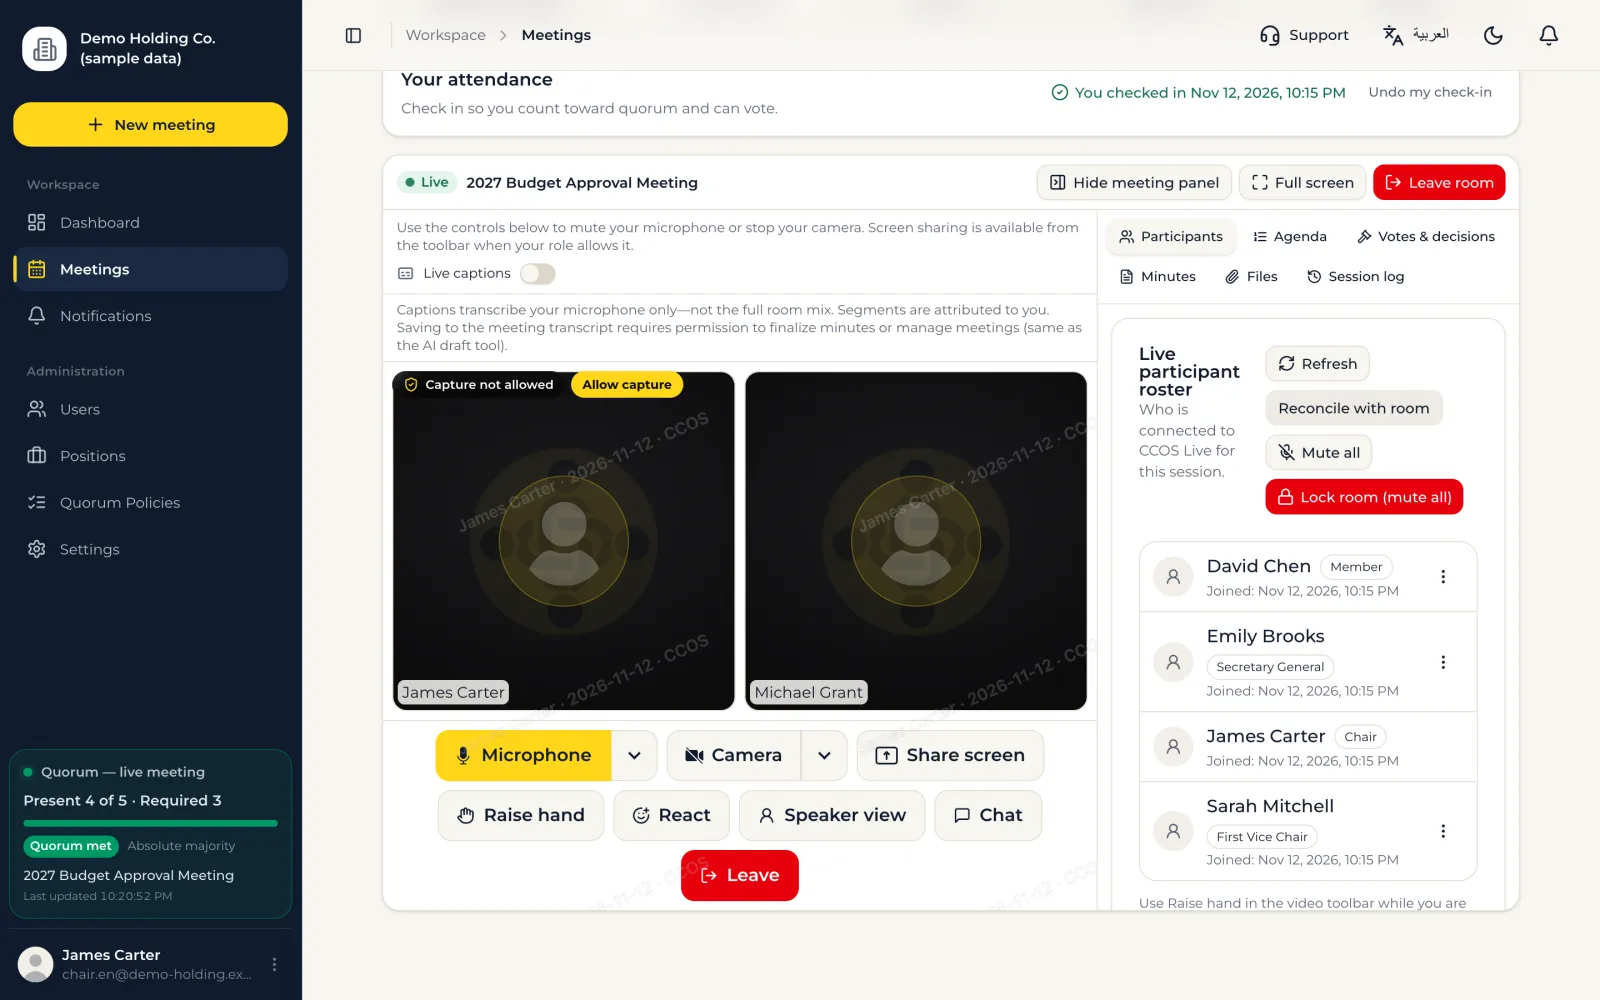
Inside the room
All meeting tools are in the bar under the video, with the meeting panel beside it.
- Microphone and camera
- On and off; the arrow next to each changes the device.
- Share screen
- Share your screen, a window or a tab; it takes the big view automatically.
- Raise hand and react
- Ask to speak, or send a quick reaction everyone sees.
- Speaker view / Gallery view
- The speaker large, or everyone equal.
- Chat
- Text messages inside the meeting, kept with its record.
- Meeting panel
- Participants, agenda, votes and decisions, minutes, files, session log. Hide it with «Hide meeting panel».
- Full screen
- The room fills the whole screen automatically with all its buttons visible. «Exit full screen» brings back the browser bars, and «Leave room» returns you to the meeting page.
- Live captions
- Text of what you say as you speak.
- Noise suppression
- On for every microphone automatically: background sounds removed, the speaker's voice kept clear.
- Leaving and coming back
- Moving around CCOS keeps you in the meeting in a small window; «Back to the meeting» returns you to the room.
Video meetings
Chair's tools
The chair and meeting managers run the room from the participants list.
- Lock room (mute all)
- Participants listen only until you unlock.
- Mute all
- Mutes every microphone at once.
- Mute or remove a participant
- From the menu next to the member's name.
- Lower all hands and clear reactions
- Clears raised hands and reactions at once.
Video meetings
Screen-capture protection
Capture inside the session is not allowed by default; only the chair can allow it with «Allow capture».
- In the browser
- Each viewer's name and today's date appear faintly over the video, so a leaked image shows who took it. Videos cannot be saved or opened picture-in-picture.
Important: No website can stop the device's own screenshot. That is why the browser shows the name watermark over the video.
Invitee entry
Joining by email invitation (members and guests)
Anyone invited by email, inside or outside the organization, joins without signing in; their details go to the chair, who admits them.
Steps
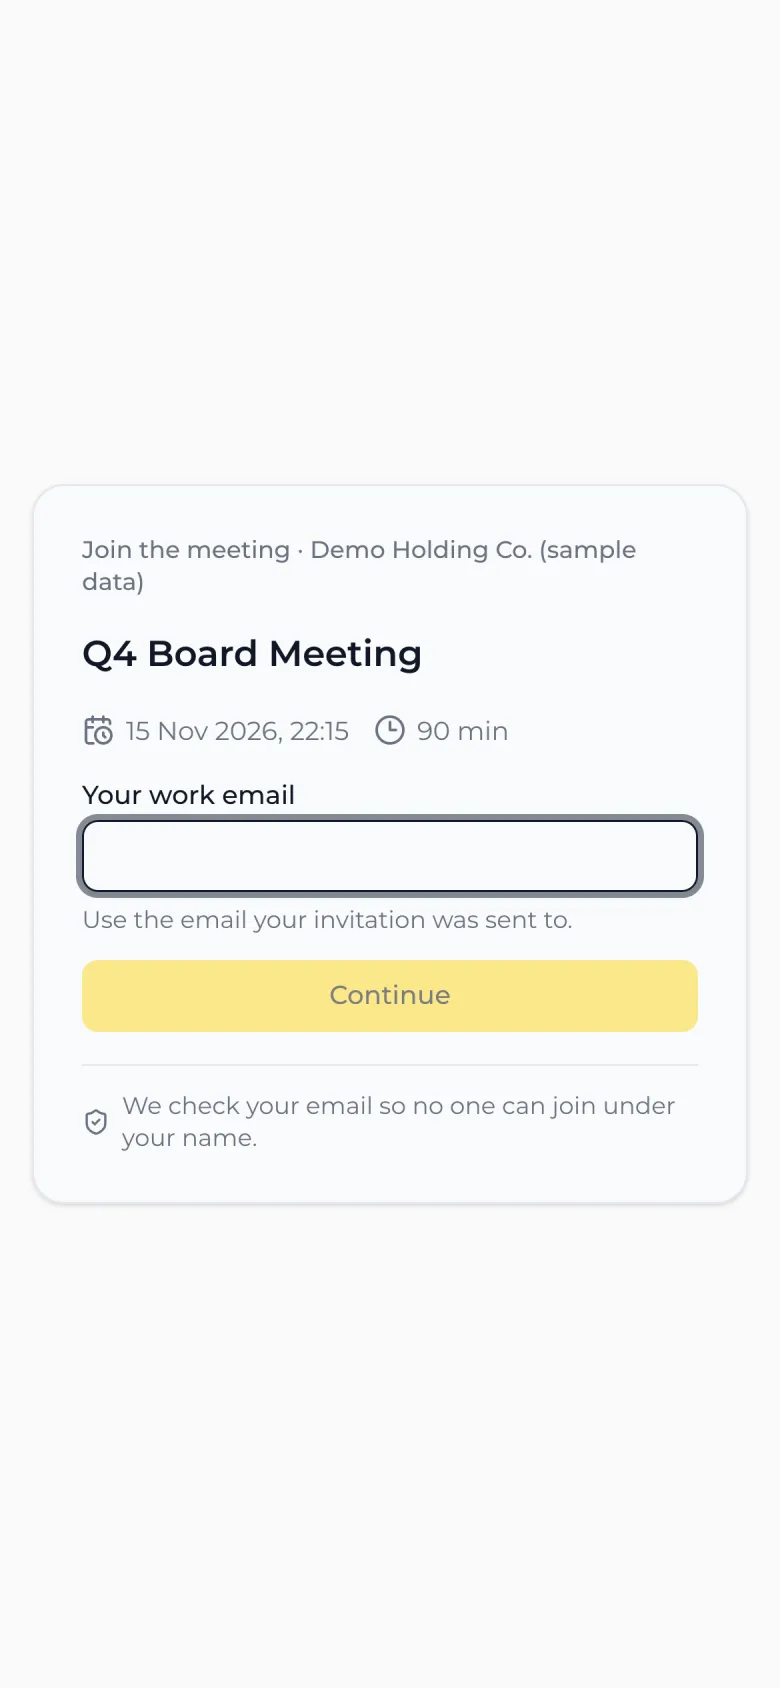
- 1Open your personal link from the invitation email. Or open the meeting's public link and type the work email the invitation was sent to.
- 2With the public link: type the 6-digit code sent to your email (valid for 10 minutes). The code is sent only if your email is invited to the meeting; if it does not arrive, check that you typed the same email the invitation was sent to, or ask the meeting organizer to add you.
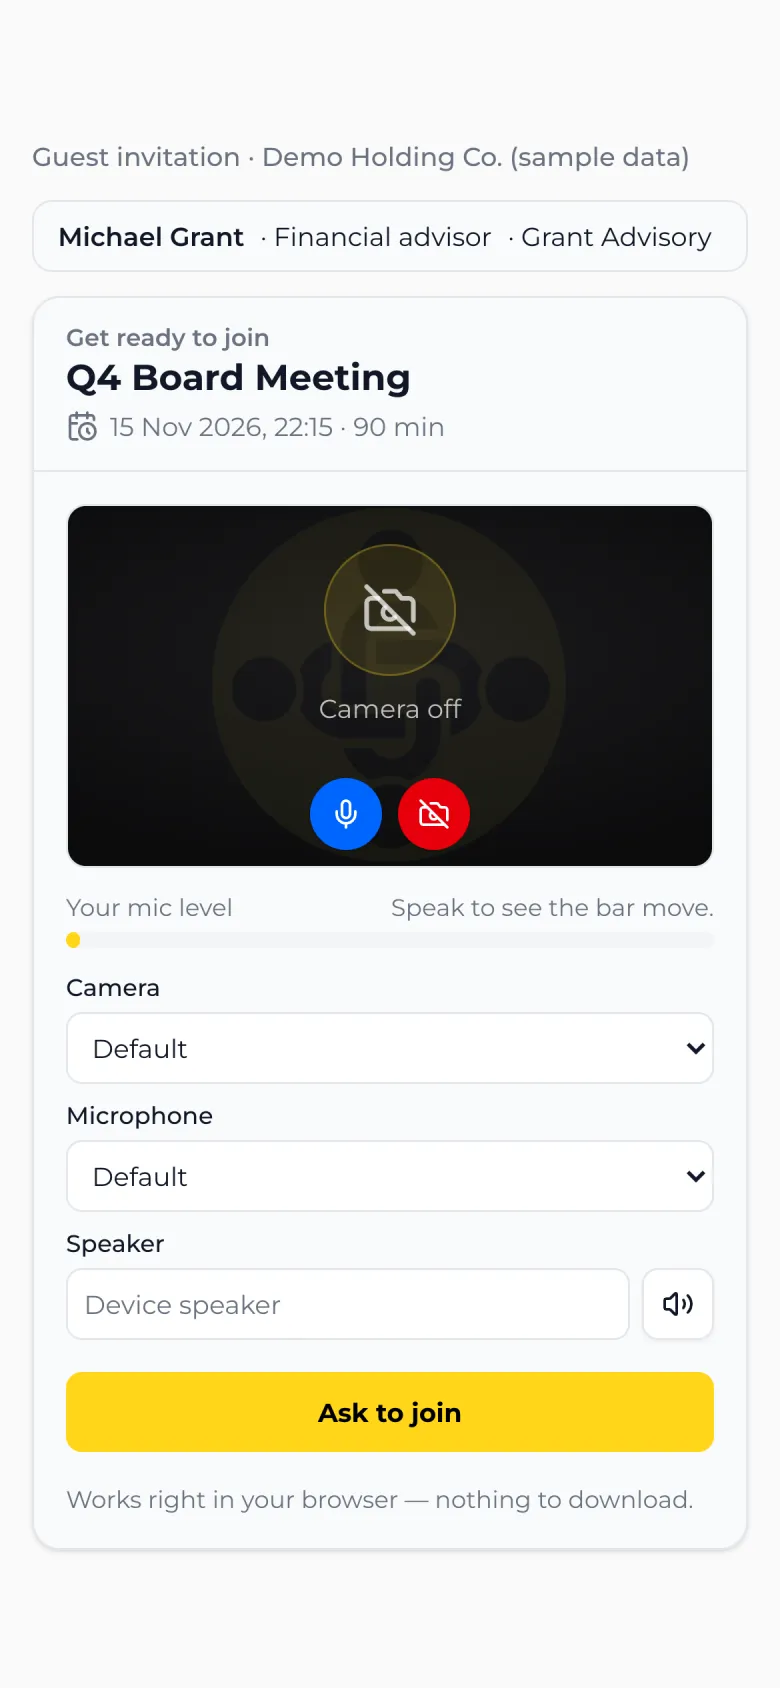
- 3Your registered details appear. Set up the camera and microphone and press «Ask to join».
- 4Wait for the chair to admit you; you then enter the room automatically.
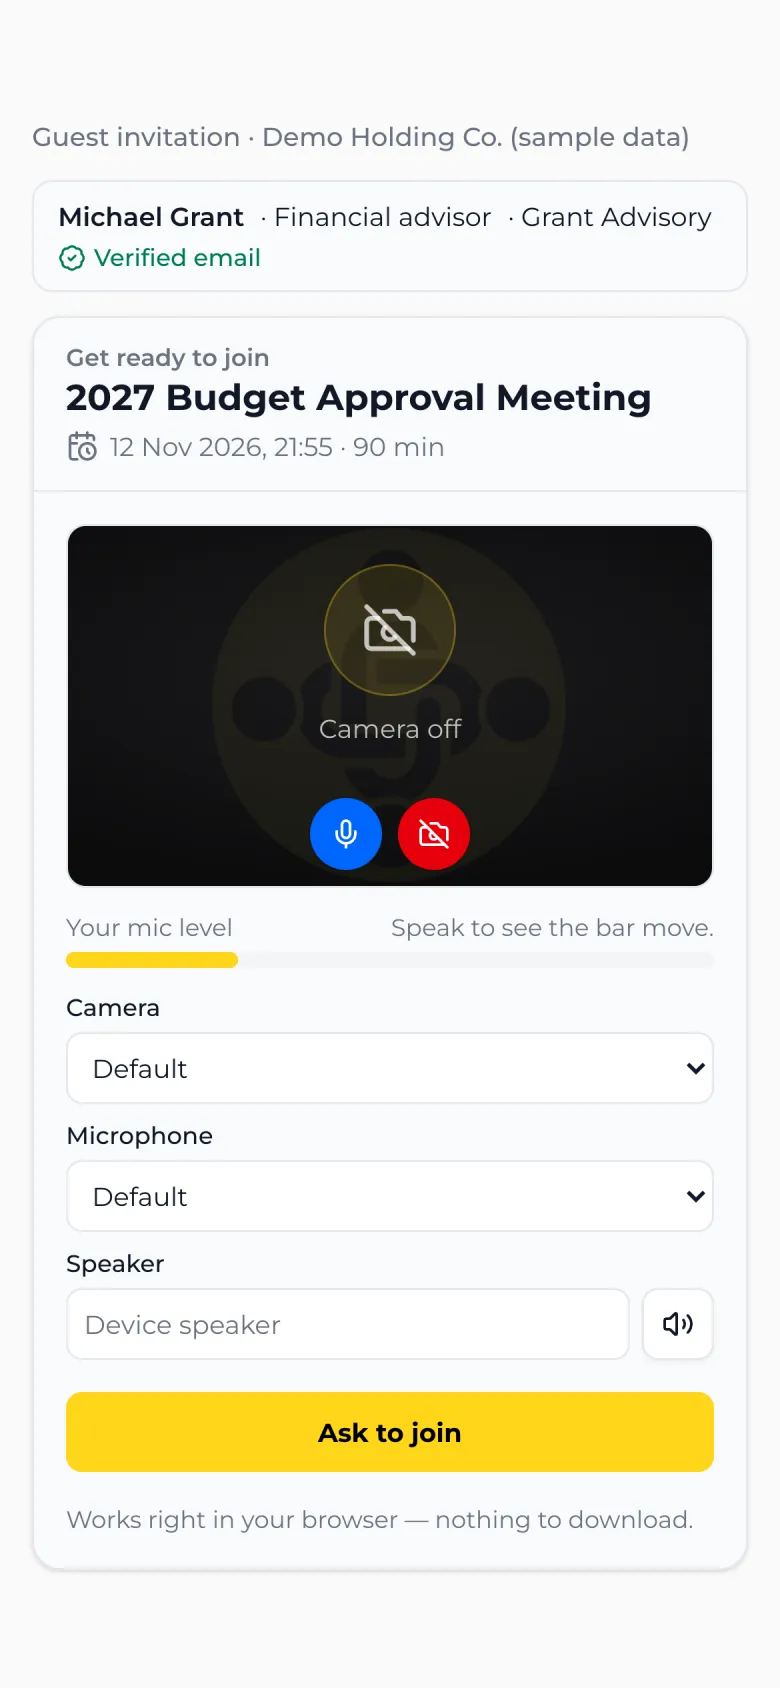
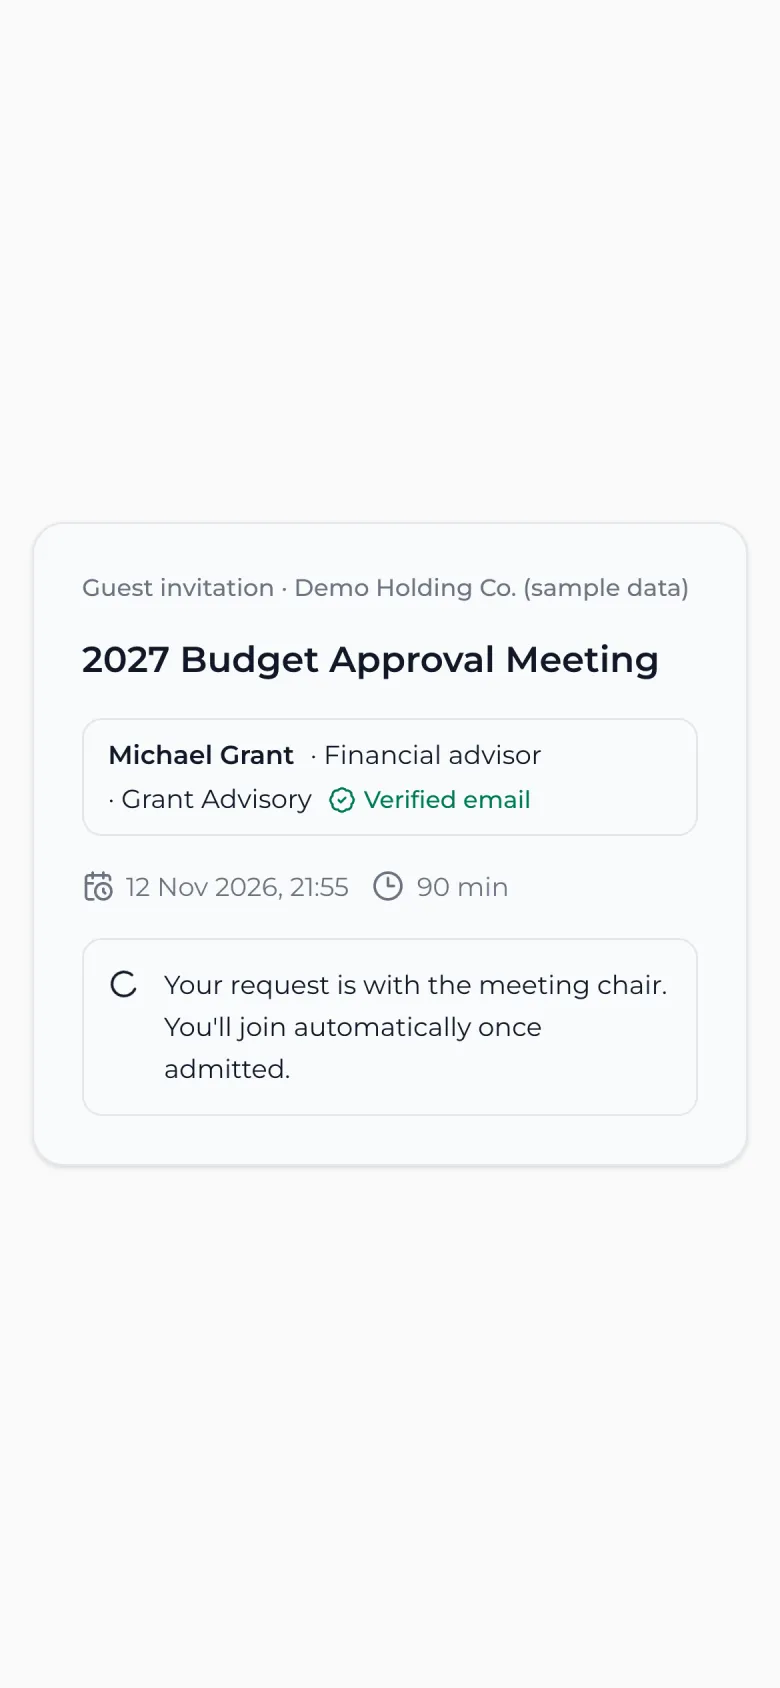
Tip: A member who already accepted the invitation goes straight in without waiting, and their attendance is recorded. Voting and signing the minutes are done from the CCOS account.
Important: Leaving the room means coming back needs the chair's approval again (except members who accepted the invitation).
Invitee entry
Admitting entry requests
The chair sees «Entry requests» in the meeting panel beside the room.
Steps
- 1Each request shows the name, job title, organization and email, a «Verified email» mark after the code is confirmed, and «Organization member» for members.
- 2Press «Admit» to let them in, or «Decline».
- 3Remove any guest from the room with «Remove».
- 4«Copy entry link» copies the short link to send.
Decisions and minutes
Voting
Votes are tied to the quorum and to the members who checked in.
Steps
- 1In the «Voting» tab press «Create Vote», type the question and link it to an agenda item.
- 2Present members vote: approve, reject or abstain.
- 3Results show live with counts and percentages; close the vote with the lock button.
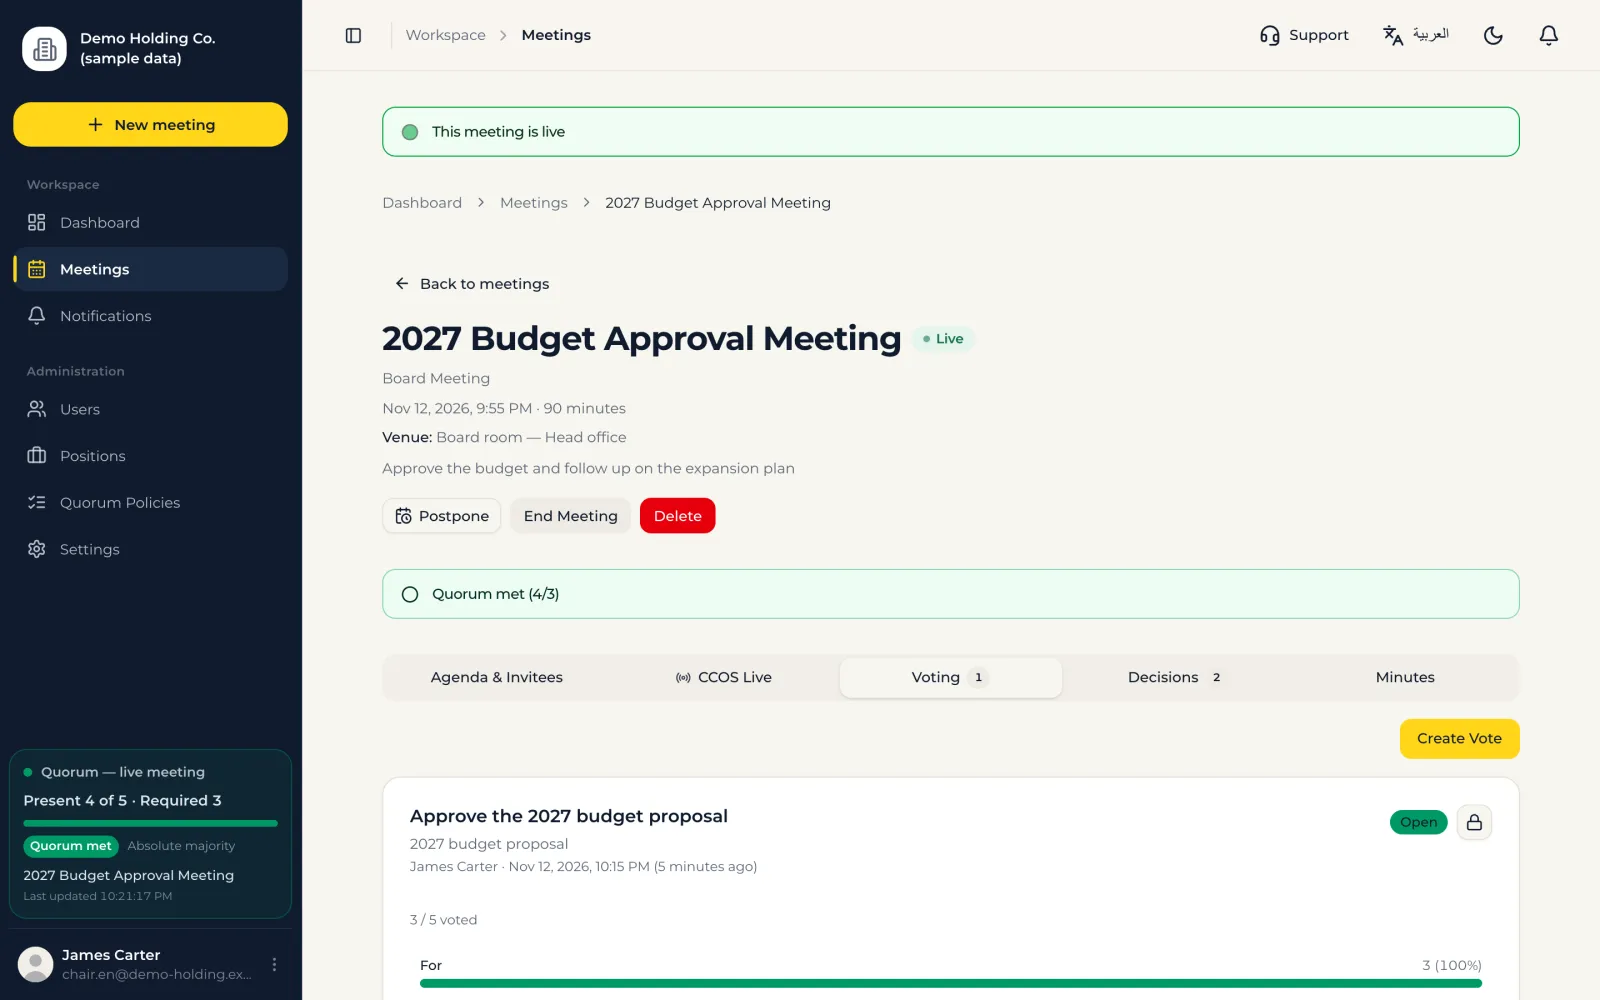
Important: Closing a vote while the quorum is not met requires a reason, which is kept in the governance log.
Decisions and minutes
Decisions and follow-up
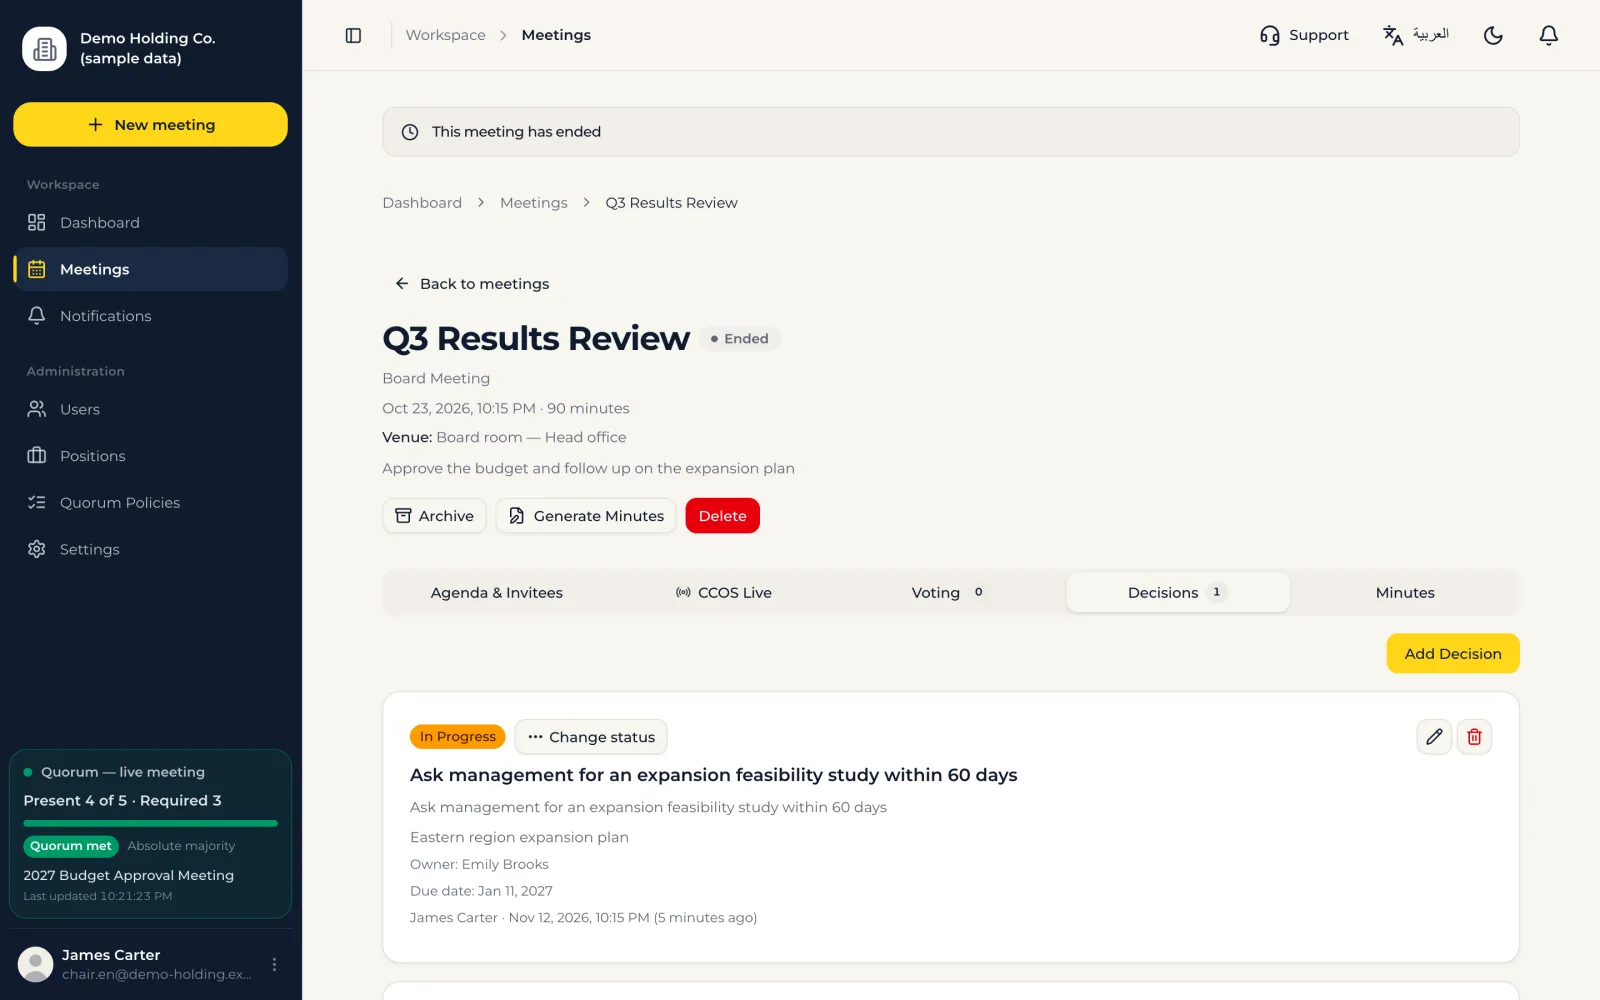
Each decision has its text, an owner, a due date and a status.
Steps
- 1In the «Decisions» tab add the decision and link it to its item.
- 2Set the owner and the due date.
- 3Follow the status: open, in progress, done, cancelled.
Decisions and minutes
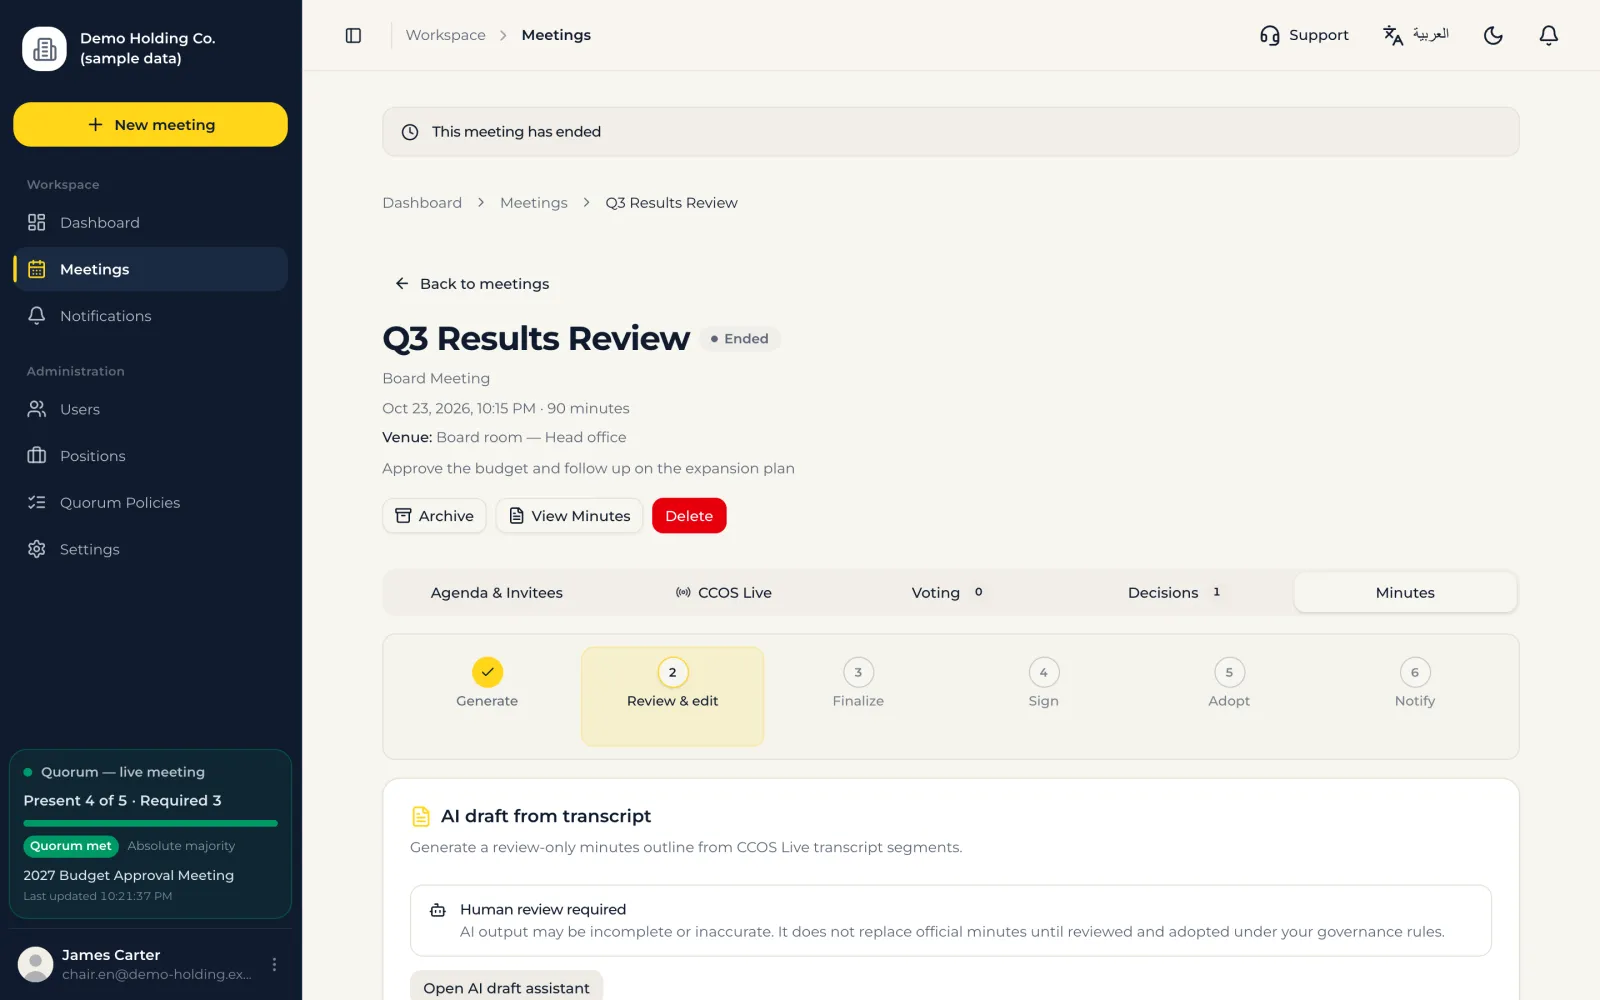
Minutes
After the meeting, the minutes go through six clear stages.
Steps
- 1Generate: the minutes are created from the meeting data (attendance, items, votes, decisions).
- 2Review and edit: the secretary edits the text.
- 3Final approval: the minutes are locked.
- 4Signing: the members concerned sign.
- 5Adopted document: upload the signed, adopted copy.
- 6Notify: email the minutes to the attendees as a PDF file with your organization's logo.
Administration
Users and permissions
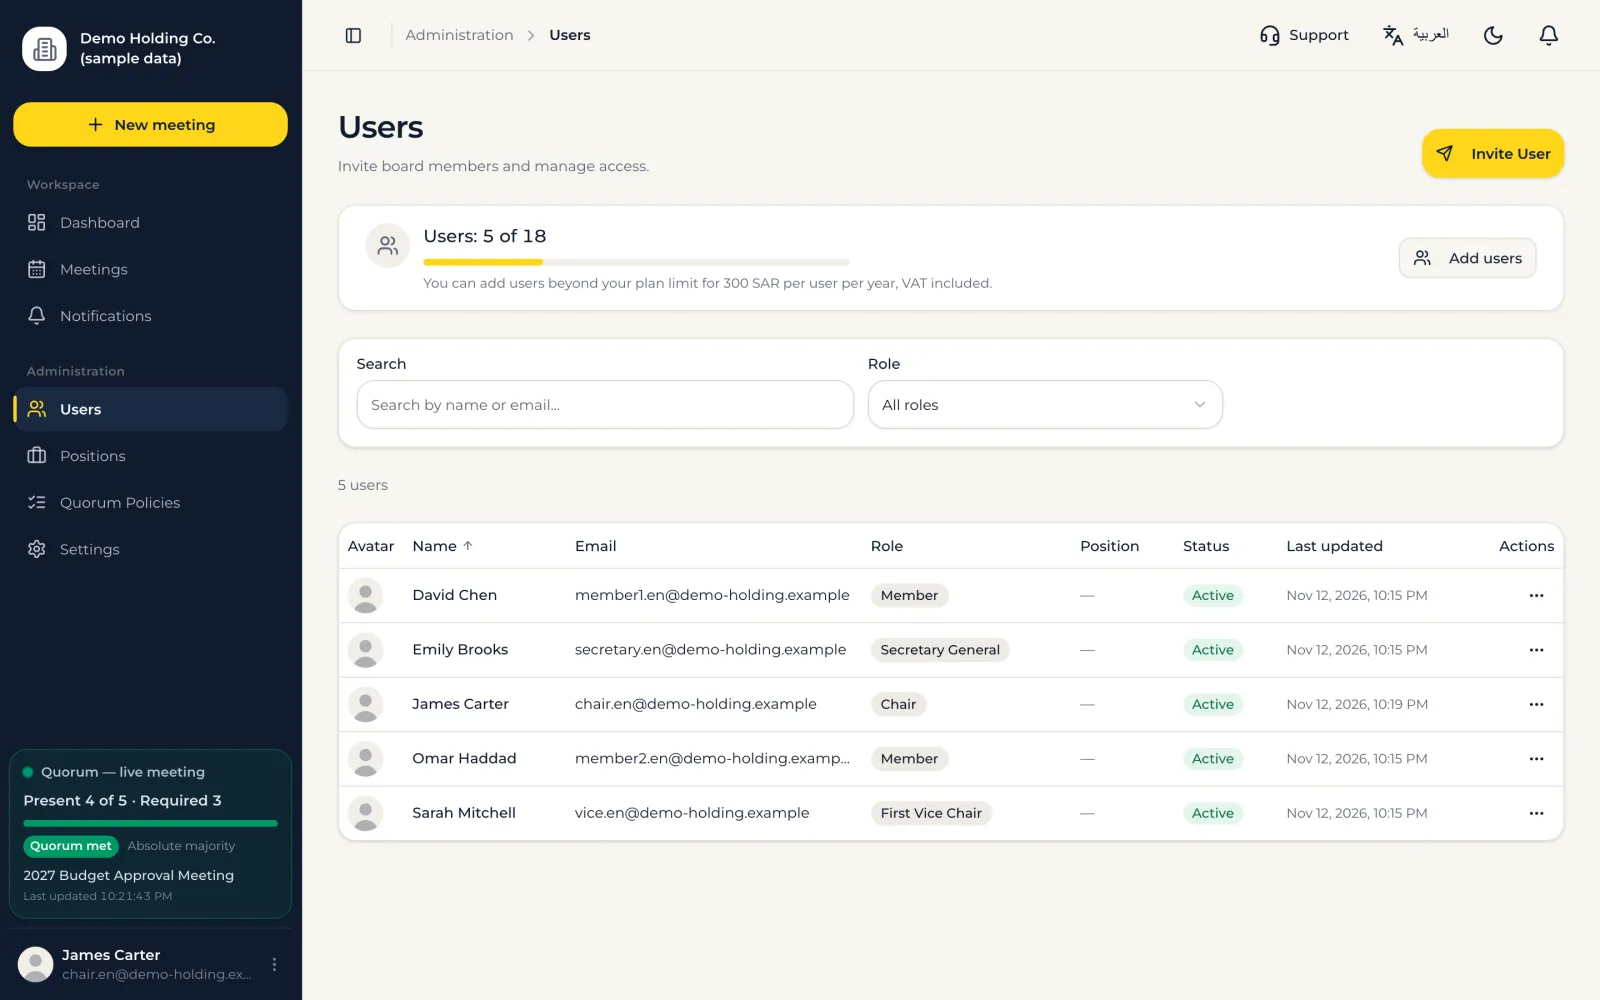
Organization admins add members and set their roles and permissions.
Steps
- 1In «Users» add a member: name, email, role and position.
- 2The member gets an email to set up a password. If it doesn't arrive, use «Issue new setup link».
- 3From each member's menu: edit, send a password reset link, reset two-step verification, deactivate.
- 4If you reach your plan's user limit, press «Add users», choose how many and pay by card ( 300 a year before VAT, pro-rated at 25 per full month left in the subscription year plus VAT; the amount is shown before you confirm). With extra users an account reaches 12 users on Starter and 18 on Professional.
- 5After that an «Upgrade your plan» button appears: choose the higher plan and pay only the price difference for the rest of the subscription year; the plan is active at once and the end date stays the same.
- 6On Enterprise (including Scale) the same page shows a «Participants in one video meeting» card: press «Add participants», choose the increase in steps of 50 and pay by card ( 125 before VAT per 50 participants for each full month left in the subscription year; the amount is shown before you confirm). The increase lasts until the year ends; lowering happens at renewal.
- 7Renewal: thirty days before the subscription ends, the account administrator gets a reminder email and a «Renew now» strip appears. Press it and pay by card; the new year starts on the end date. On Scale, the renewal page lets you choose how many participants to keep for the new year ( 1,500 before VAT per 50 participants).
Administration
Positions
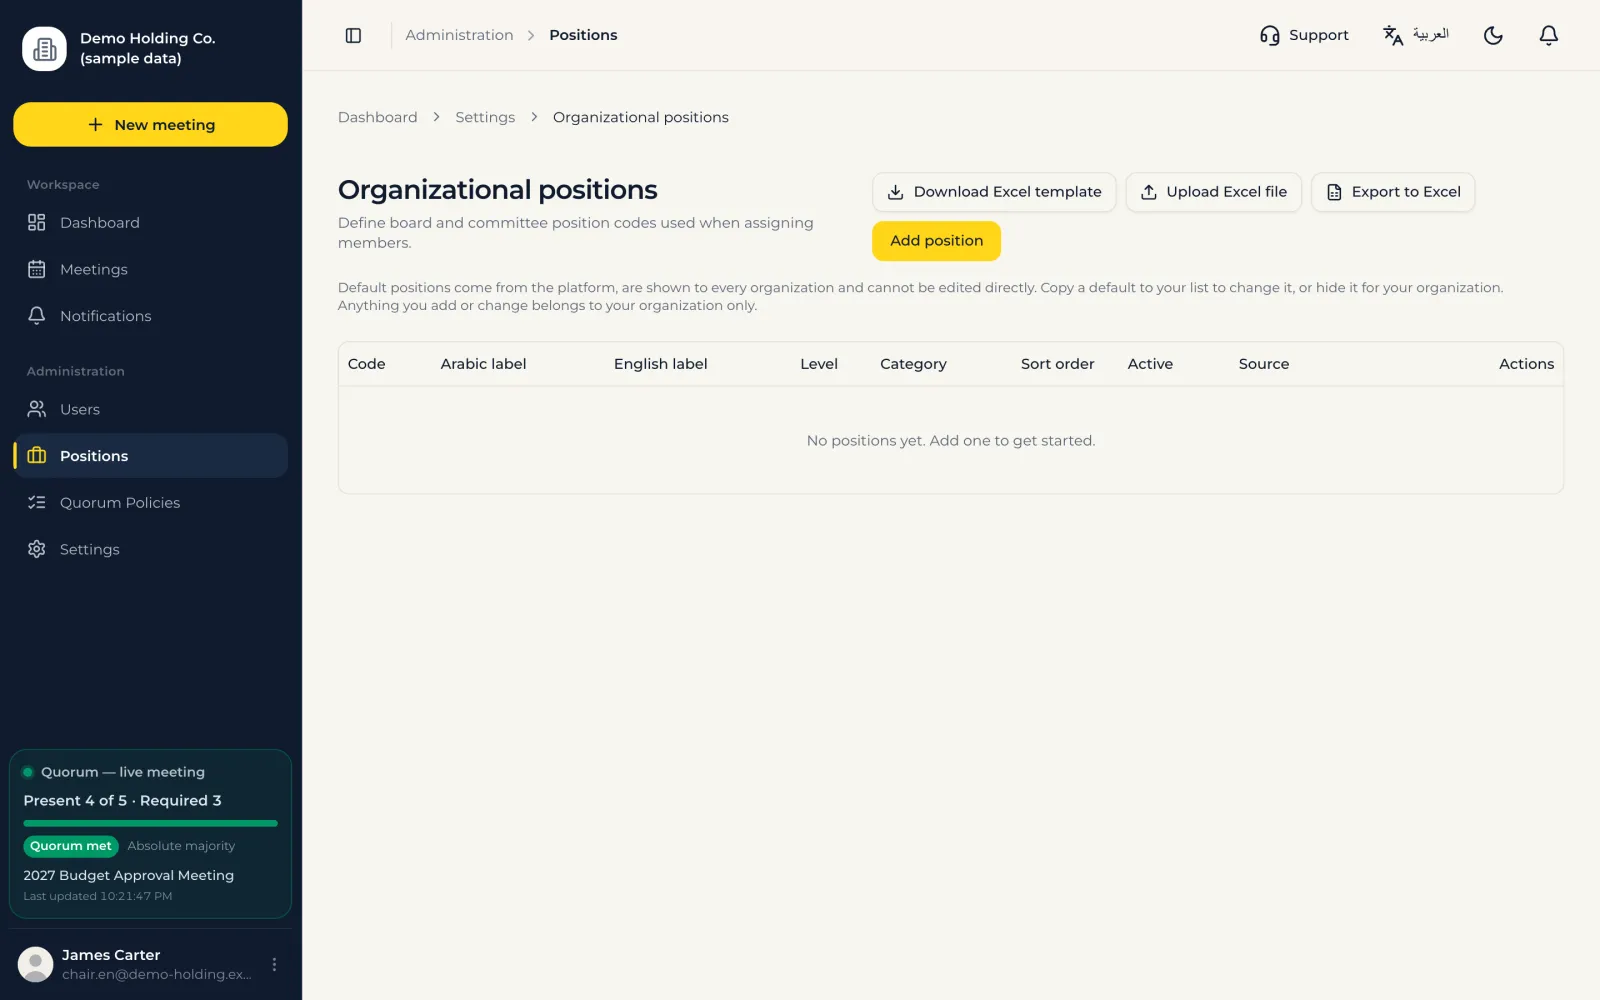
Ready-made positions (chair, vice chair, secretary, member…) plus your organization's own.
Administration
Quorum policies
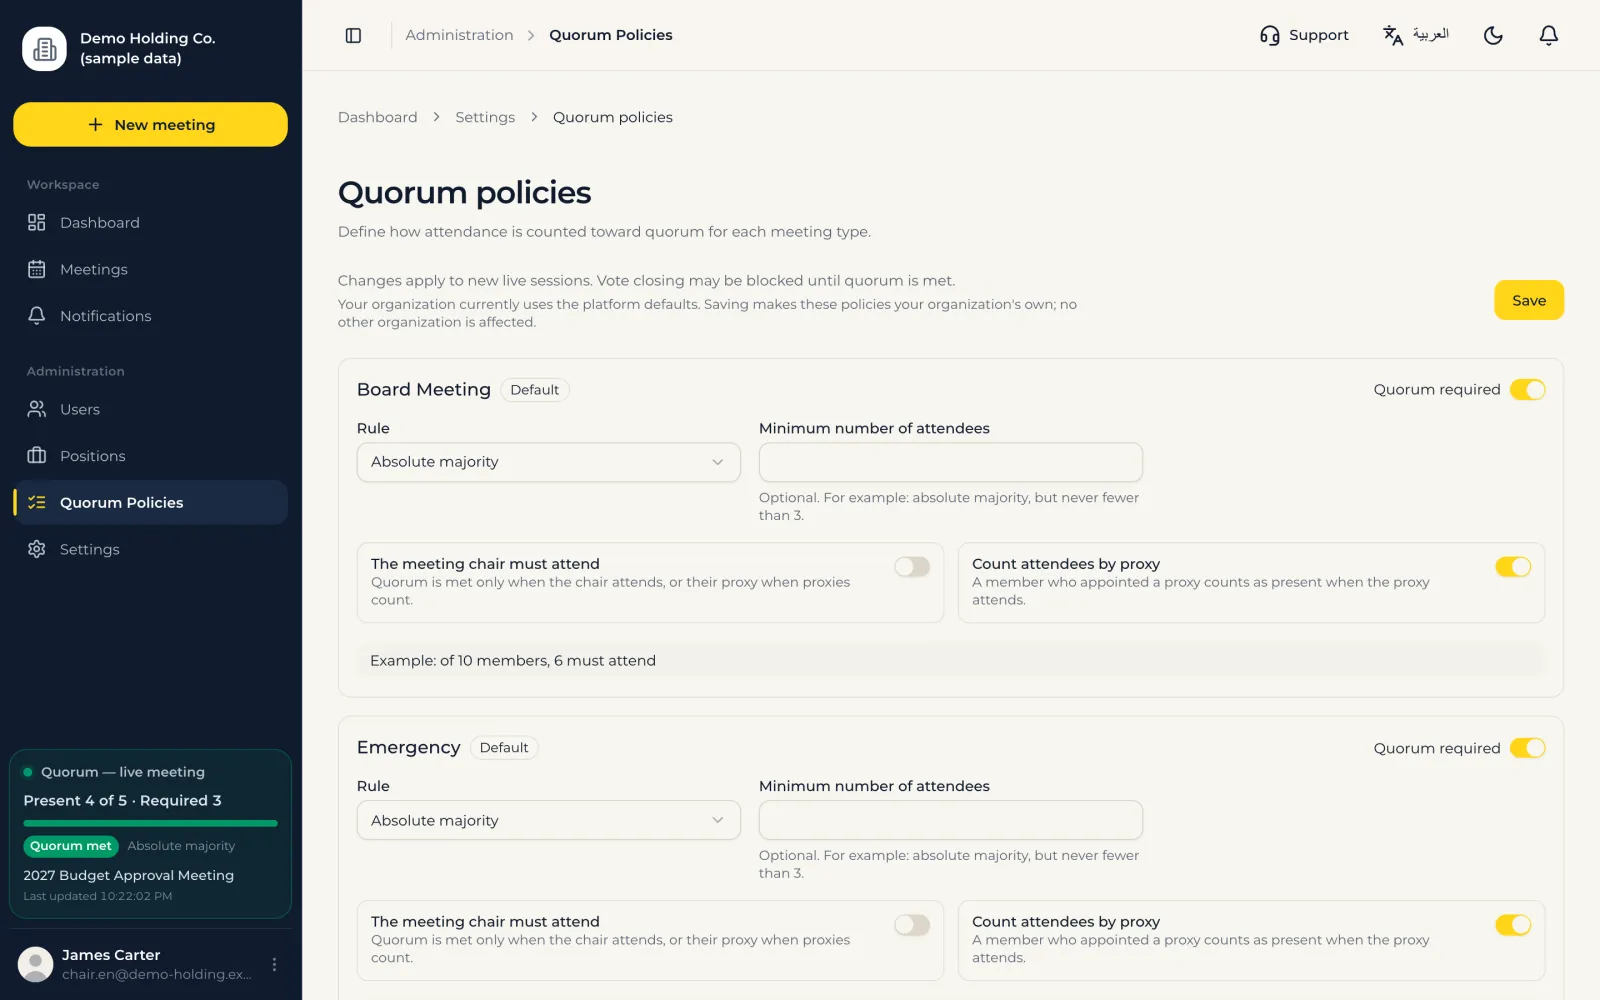
Set how the quorum is counted for each meeting type (absolute majority, percentage, number); its status shows live during the meeting.
Administration
Subsidiaries
For holding groups that run their subsidiaries' boards in one account: each company's meetings and documents are visible only to its members.
Steps
- 1Open «Subsidiaries» in the Administration menu and add each company by name; mark the holding company if you like.
- 2Press «Edit» on a company and choose its members from the account's users.
- 3When you create or edit a meeting, choose its «Company». Without a company the meeting stays visible to every member of the account, as today.
- Company members
- See their company's meetings with the agenda, files, minutes, decisions and votes, and never another company's meetings.
- Meeting invitees
- Anyone invited to a specific meeting can attend it and read its documents even if they are not a member of the company, such as an independent director.
- Account administrators
- The Chair and anyone allowed to manage users see every company, because they manage the companies and their members.
Important: A company that has meetings cannot be deleted, so its meetings never become visible to everyone. Move its meetings first. Every create, edit and move is kept in the audit log.
Administration
Organization settings
Organization name and logo (shown on invitations and minutes), the organization code in meeting numbers, and the email used to send invitations and minutes.
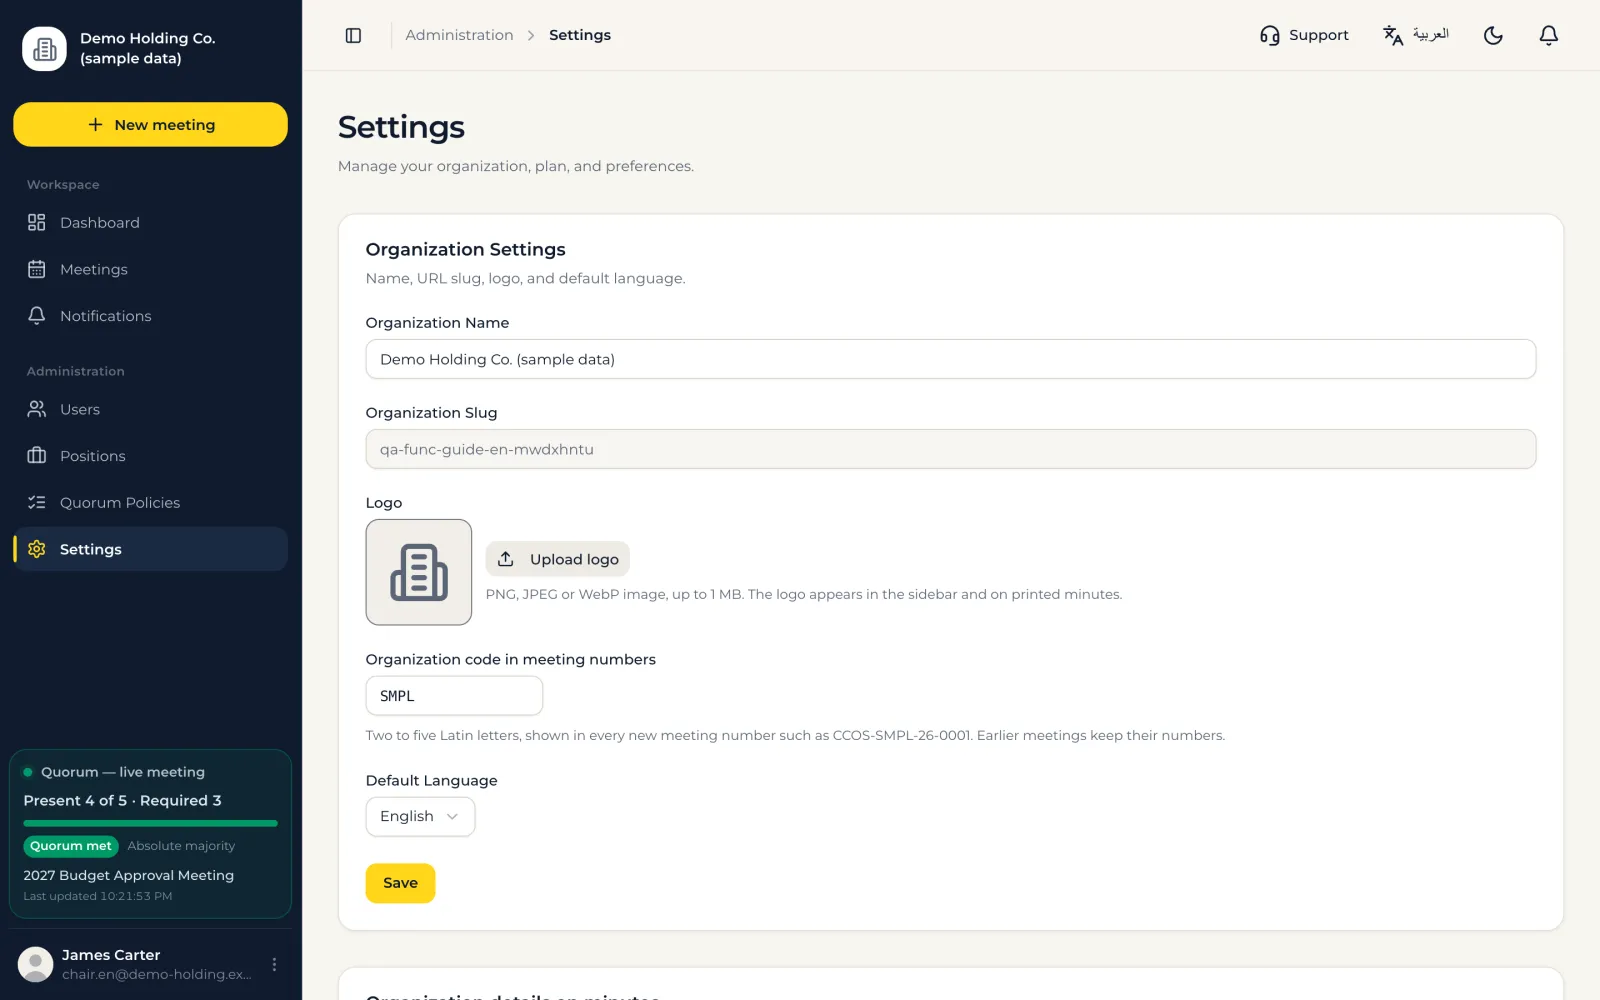
Tip: The default CCOS email works for most organizations; you can connect your own mailbox in Settings.
Your account
Notifications
Invitations, meeting start, votes, decisions and minutes reach you inside CCOS, and on your device once you turn on «Notifications on this device». Reminders arrive a day and an hour before the meeting.
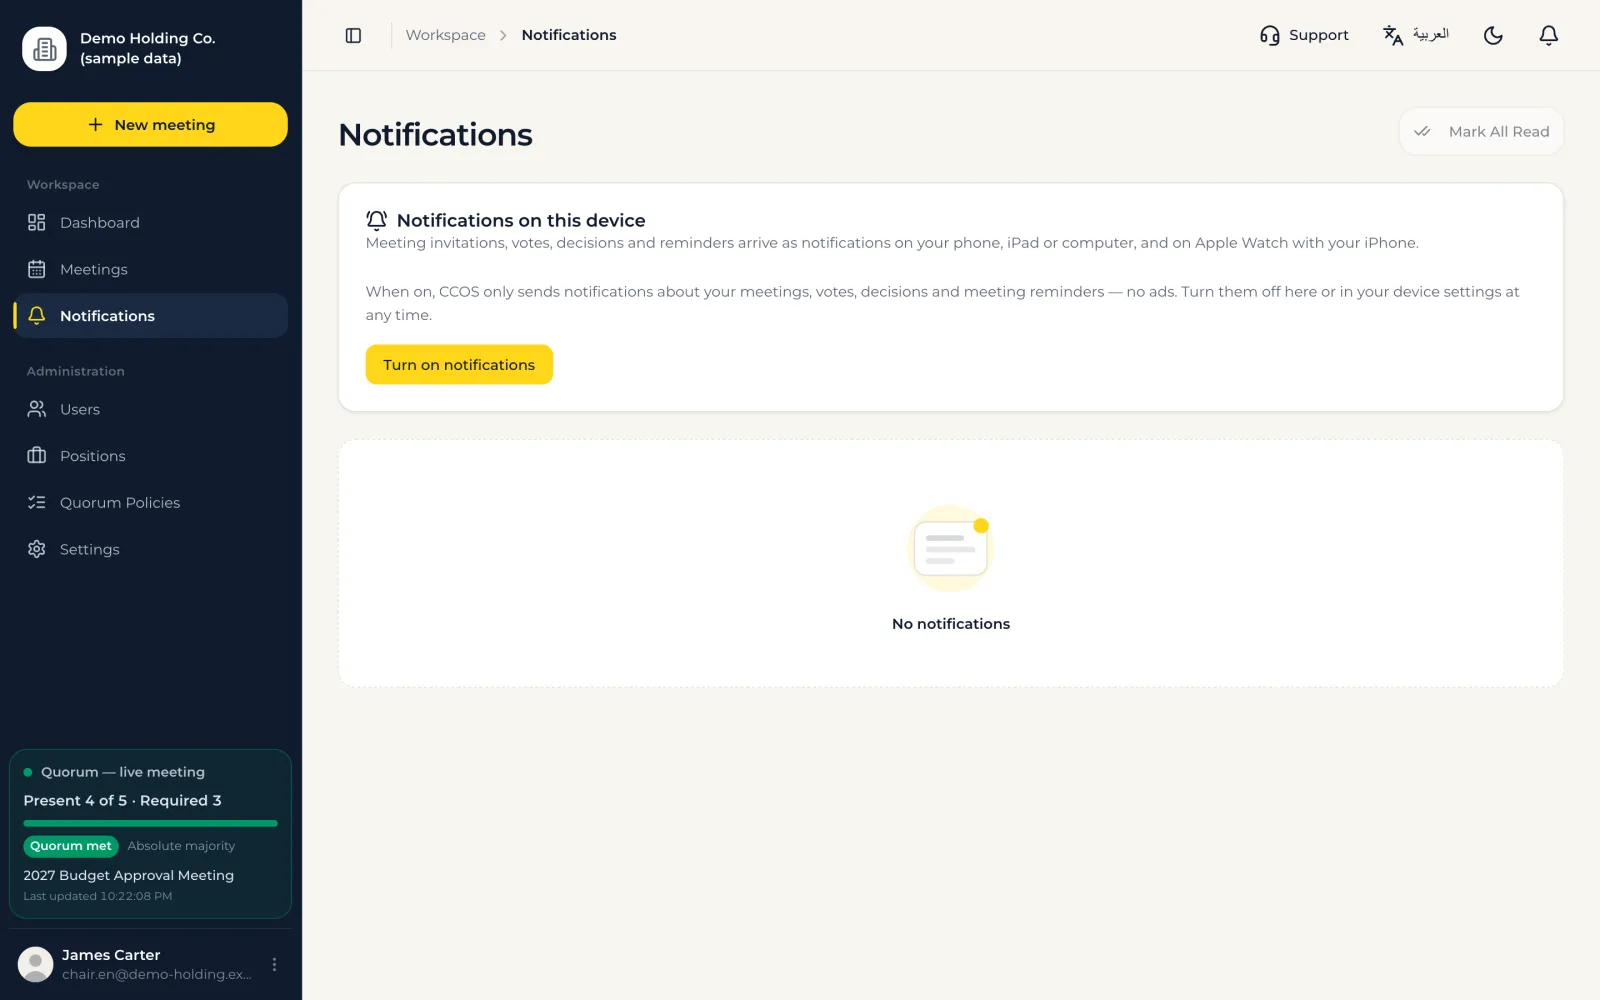
Tip: On iPhone and iPad, add CCOS to the Home Screen first to receive notifications.
Your account
Support and incident reports
Raise any request from the support button inside the platform, or at support@mahsumaah.sa or WhatsApp +966548444431, Sunday to Thursday, 9 am to 5 pm.
Steps
- 1Choose the severity: «Blocks work» (response within 4 working hours), «Partly affects work» (within 1 working day) or «Question» (within 2 working days).
- 2Your request reaches the support team and Mahsumah's chairman by email at once, and you see its number and response time.
- 3If a fault that blocks work is not resolved within one working day of the first response, it is escalated to Mahsumah's chairman, and we email you at each stage.
- 4You may object in writing to the level of support at info@mahsumaah.sa; we reply in writing within 5 working days.
Your account
My account
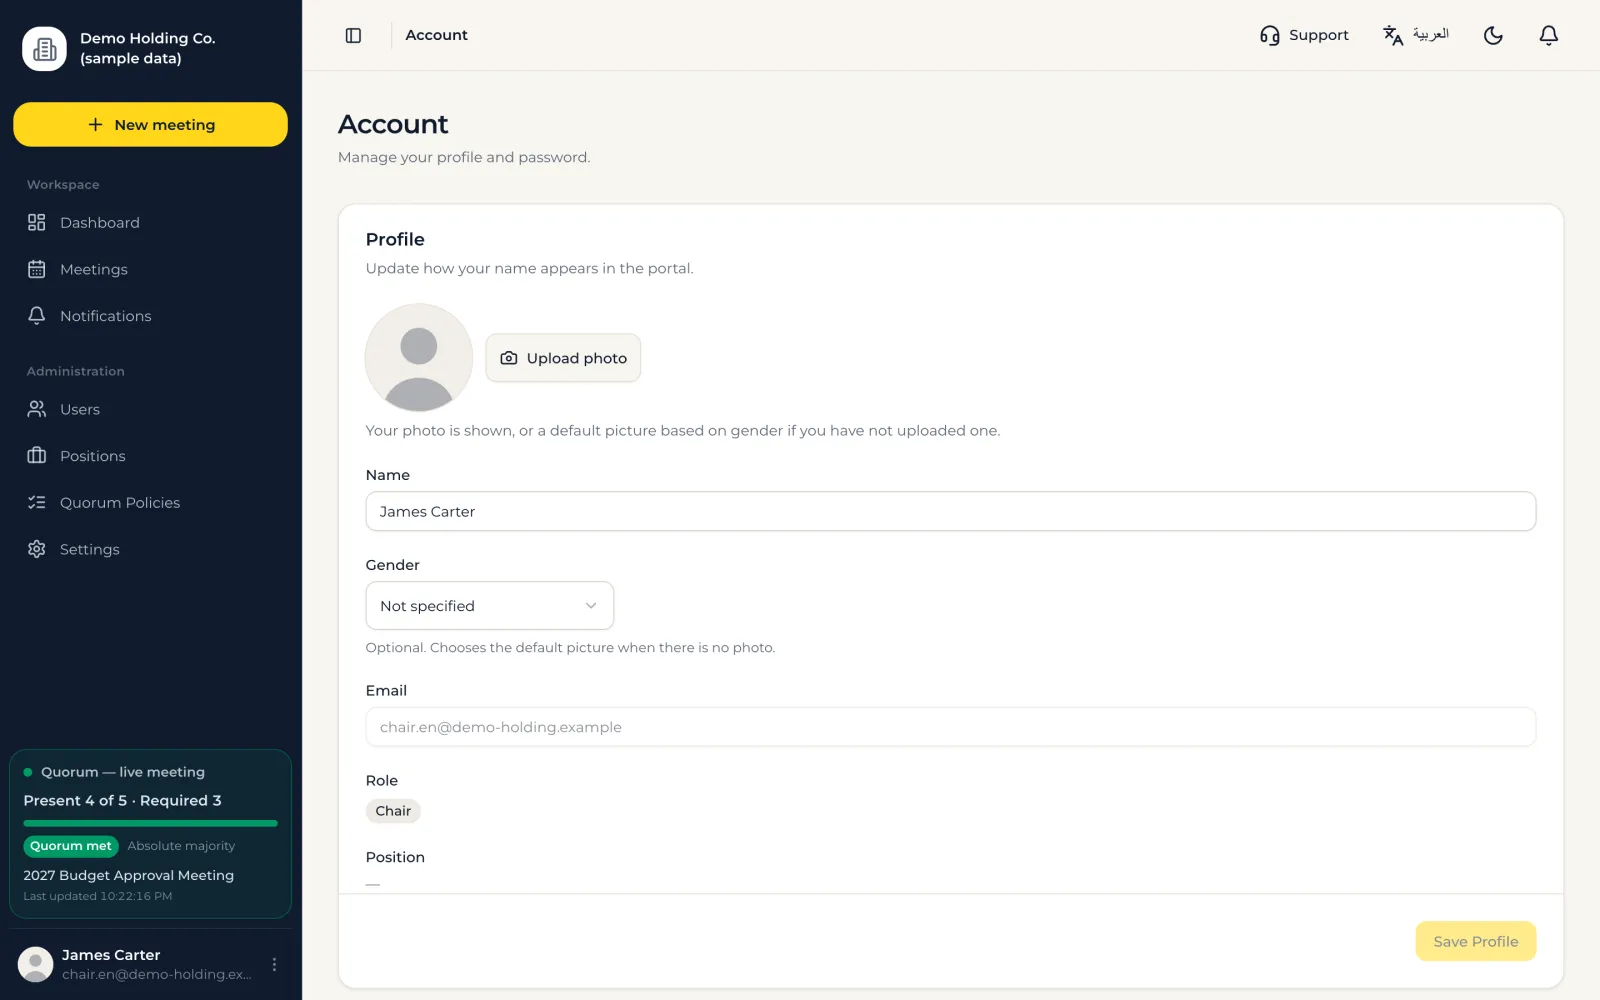
Your details, password, two-step verification and the devices that receive notifications.
Your account
Deleting your account
Delete your account yourself from «My account» after confirming your password and authenticator code.
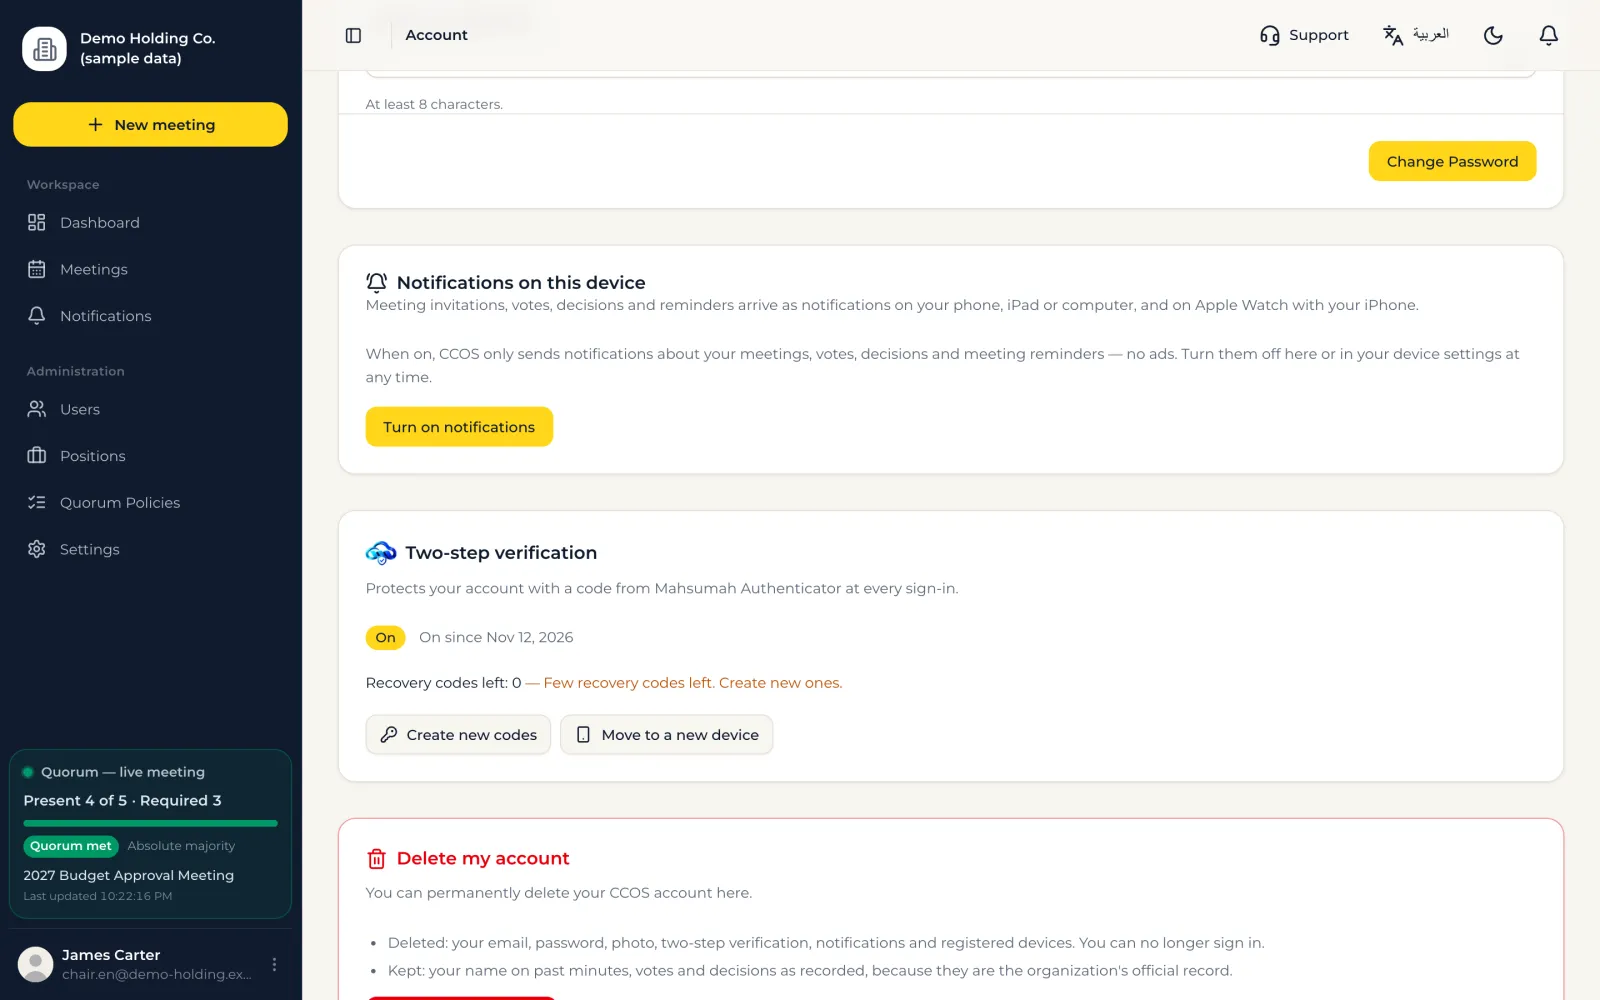
Important: If you are the organization's last admin, hand the administration to another member first.
Your account
The CCOS mobile app
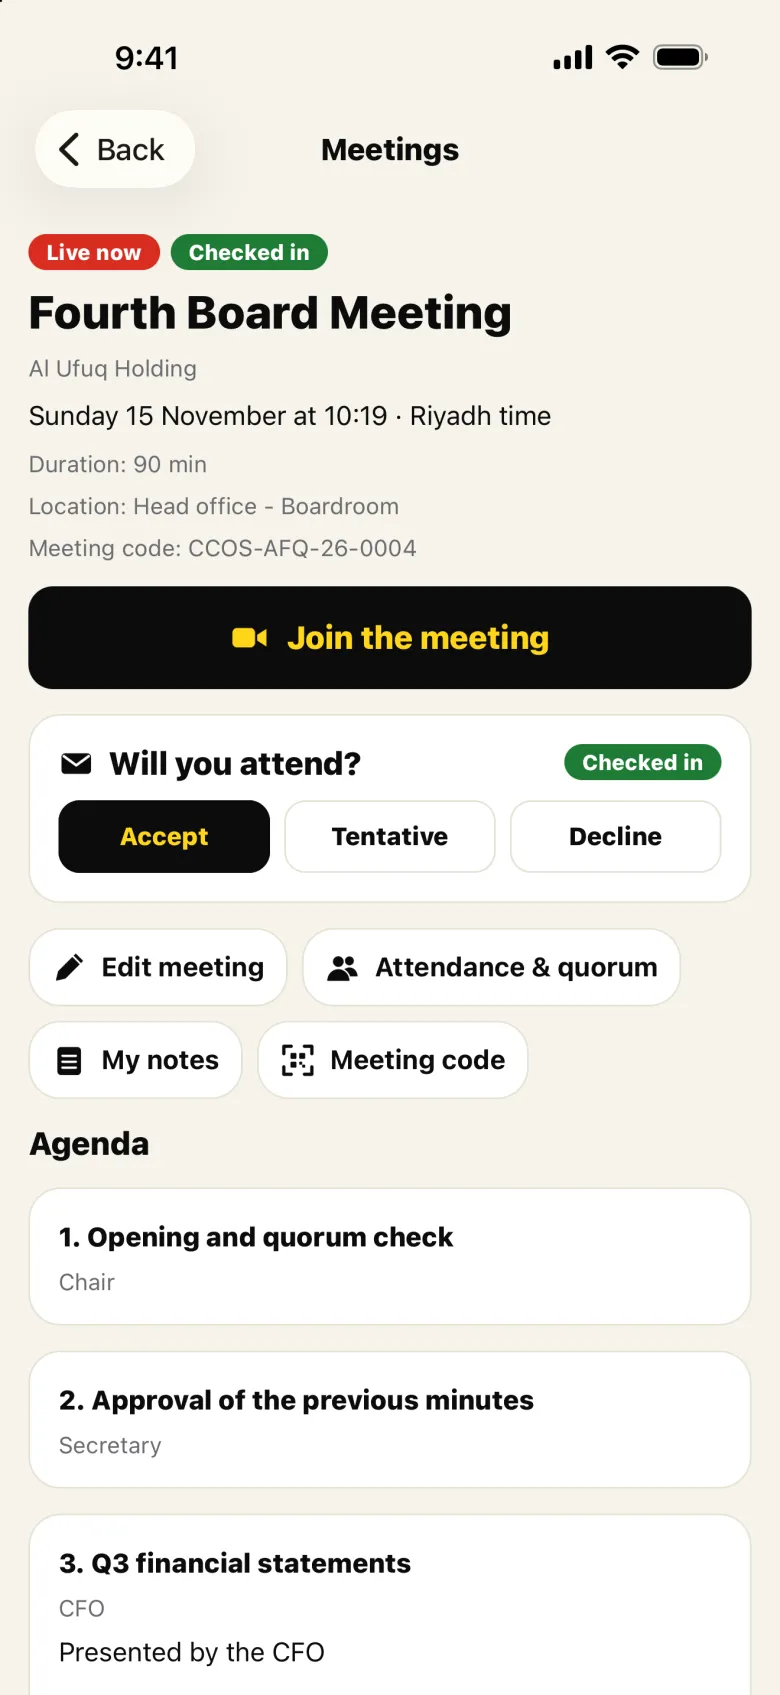
The CCOS app is on the App Store for iPhone and iPad. The app is for board and committee members; the website runs the organization and its meetings end to end. Same account, same data.
Steps
- 1Search for «CCOS» on the App Store, or press the App Store button at the bottom of this website, and install the app.
- 2Open the app and sign in with your account email and password, then your two-step verification code.
- 3Allow notifications to be alerted to invitations, meeting start, voting opened and minutes ready.
- 4From Home: «Join now» for the live meeting, «Vote now», «Answer invitations» and «Sign minutes».
- 5Long-press the app icon for shortcuts: next meeting, meetings and notifications.
- The website
- For the secretary and account admin: subscription, payment and invoices; users, permissions and settings; creating meetings, running the session and preparing the minutes.
- The app
- For members: alerts, answering invitations and checking in, the agenda and files, voting, the video meeting and signing minutes.
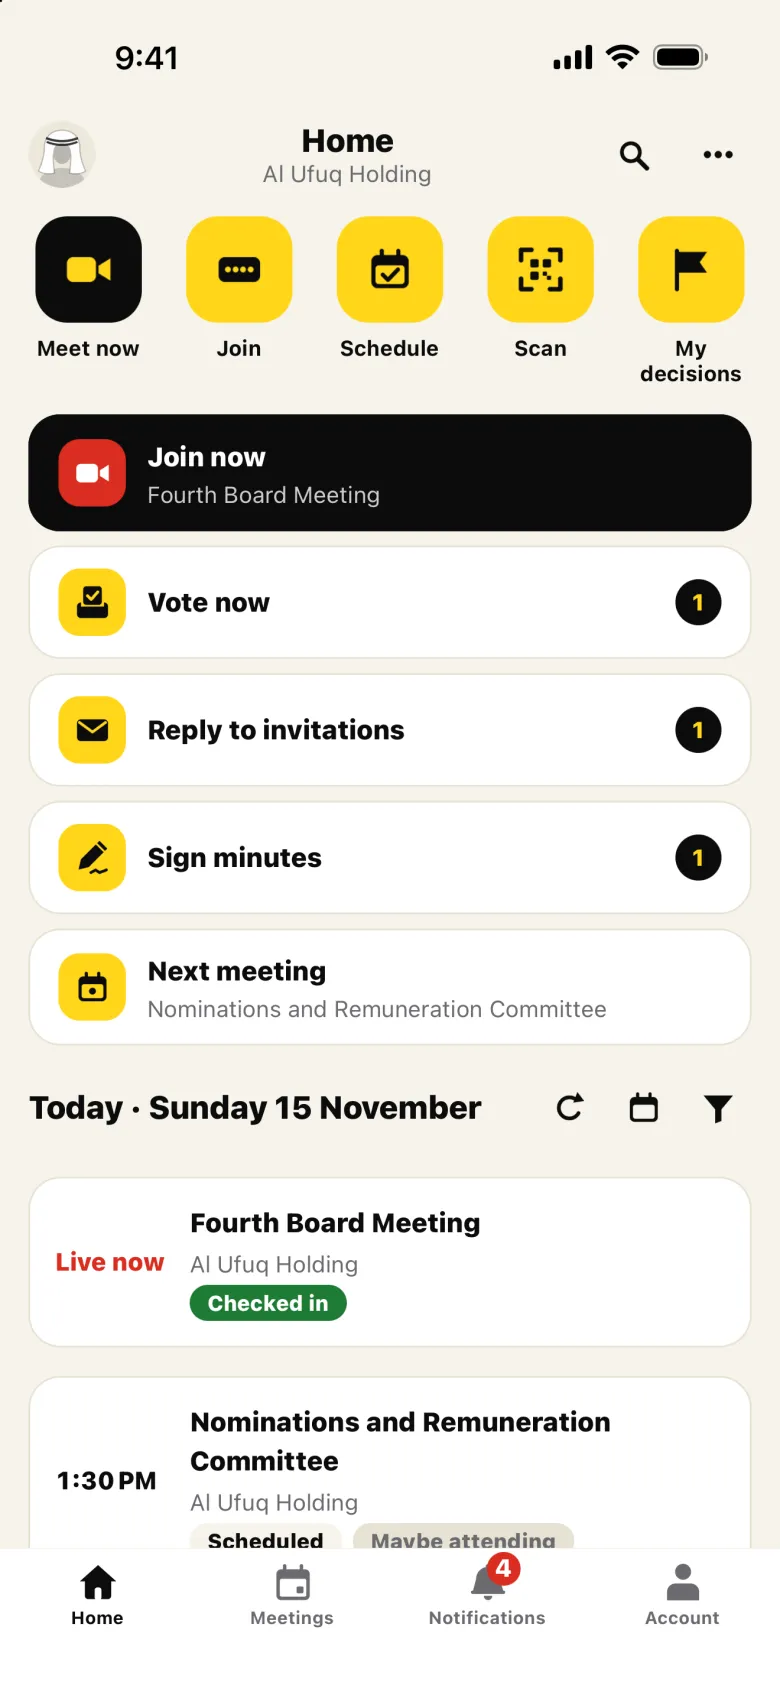
Important: The app has no sign-up and no payment: your organization's admin adds you on the website, and subscriptions are handled on the website.
Your account
In the phone's browser
No app needed either: CCOS works in the phone's browser with the same screens, including video meetings and invitee entry.
Frequently asked questions
Can members of one subsidiary see another subsidiary's meetings in the same account?
No. A company's meeting is visible only to its members, its invitees and the account administrators. Set it up in «Subsidiaries».
Does a guest need an account?
No. They join from the invitation link, or with the meeting link, their email and a code, and the chair admits them.
Do members need to sign in to attend a video meeting?
No. The personal invitation link is enough. Voting and signing the minutes are done from the account.
What if I leave the room by mistake?
Come back with the same link. A guest needs the chair's approval again; a member who accepted the invitation goes straight in.
Where is meeting data kept?
The platform and its database are hosted in Saudi Arabia, and audio and video are encrypted in transit. The Privacy Policy explains what may be processed outside the Kingdom, such as video meetings, outgoing email and live captions.
What is the difference between the website and the app?
The website runs the organization and its meetings end to end and suits the secretary and account admin; the app is for members: alerts, voting, the video meeting and signing minutes. The same account works in both.
I forgot my password. What now?
Press «Forgot your password?» on the sign-in page; you get a link valid for one hour.
Can a meeting that has started be postponed?
Yes, with «Postpone». The room closes, the meeting goes back to scheduled, and session time is not used up.
How does the platform prove a proxy is genuine?
A proxy is accepted in two cases only: the member creates it from their own account, or a meeting manager creates it for them and attaches the authorization letter the member signed. Who created it, when, its scope and its basis are recorded, and it appears in the minutes and the audit log.